
Kato Colour mixing Chart - this post can be found on my new blog here
www.carajane.co.uk
Tuesday, 27 April 2010
Monday, 26 April 2010
Latest flower canes
Just a quick one to show you some of my latest canes. I am pretty pleased with how they worked out. This is the first time I have tried a rose cane or the reversed skinner blend one. The one on the far right with the green is from the Ayelet Beads tutorial I bought a while back.
If I was making the rose one again I would have less white in my skinner blend cane centre.

If I was making the rose one again I would have less white in my skinner blend cane centre.

Sunday, 25 April 2010
Conditioning Kato Clay
Having recently discovered Kato clay I am now a complete convert. I love the Kato clay to work with and I now find Fimo too soft and sticky (although I now realise this is a problem with fimo at the moment). The problem with Kato is it is SO difficult to condition. I haven't tried the latest formulation of Kato which is supposed to be easier to condition yet.
I have tried some different methods for conditioning Kato clay and here are my findings.
As I would Fimo
With Fimo and Premo you can just squash up a bit of clay and roll it through the pasta machine. The odd block of Fimo would be a bit more of a challenge and would need a bit of squishing and rolling in your hands first before it was soft enough to be rolled in the pasta machine.
This doesn't work for Kato, it is too firm for me to squish into a ball from the packet and many blocks just fall into crumbs the minute you try.
Cutting slices
 I found out about this from Sue on Cindy Leitz's blog, she passed on the information given on an Australian clay suppliers website Over the Rainbow.
This works but it is slow and I am impatient. Each slice is small and if you are using big amounts of clay it takes far too long. The secret I worked out at last is the initially rolling. If the clay is crumbly roll it more with the rolling pin first or you get crumbles in the pasta machine as shown (I hate that!). I try to short cut putting several sheets together but I think it is best to have them part conditioned first on reflection before bulking up. This is also basically the method recommended by Donna Kato herself and she should know!
Food Processor


I bought a little chopper just for clay. I found I could put about 2oz of clay in at a time without stressing the motor (getting horrible grinding noises) as long as I chopped them into pieces about 2x1x1cm. Run the chopper in bursts until the clay is lots of fine pieces. I then find it easiest to put the clay crumbs into a Ziploc bag and then roll them with a rolling pin in the bag. This helps the crumbs to stick together with no fear of loosing them. The clay is nice and warmed up by now and should go through the pasta machine no problem. A couple of rolls and it is ready to use.
 To be honest this is a fair bit of hassle too. It's great if you are colour mixing from a recipe as you can just put the parts in the chopper and it is more than half mixed already. I am buying big blocks of Kato the 12.5oz ones so will probably have a conditioning session at the start of a project using the chopper and then store the clay in sheets. They can easily be reconditioned by passing through the pasta machine.
The bottom picture shows what it looks like out of the Ziploc bag on the left and after first pass through the pasta machine on the right.
Jana whack
This is the method used by Jana Roberts Benzon. Basically you take your block of clay and whack it. Leave the clay in the wrapper and whack it with a hammer, rubber mallet, wooden rolling pin. Works pretty well and is a good arm exercise, tension reliever. Not ideal with those who have problems with hands/arms and it means getting stuff not in my clay kit out. You still have to do a bit of rolling to get it thin enough to go in pasta machine but no crumbs in sight!
(more info in an article at Polymer Clay Express )
Conclusion
Since I wrote this I have found that if I am colour mixing a fair amount of clay I use the chopper but other than that I tend to use the slice method cause as long as I roll well to start with crumbs are avoided and it saves getting extra kit out. I am using the big blocks of Kato so I do 1/4 block at a time - about 3 oz. This would be 3 slices so it isn't so bad.
Anyone else got any conditioning tips to share? I have heard people talk about driving over it with their car but that's a bit extreme for me I think!
I have tried some different methods for conditioning Kato clay and here are my findings.
As I would Fimo
With Fimo and Premo you can just squash up a bit of clay and roll it through the pasta machine. The odd block of Fimo would be a bit more of a challenge and would need a bit of squishing and rolling in your hands first before it was soft enough to be rolled in the pasta machine.
This doesn't work for Kato, it is too firm for me to squish into a ball from the packet and many blocks just fall into crumbs the minute you try.
Cutting slices
 I found out about this from Sue on Cindy Leitz's blog, she passed on the information given on an Australian clay suppliers website Over the Rainbow.
 Cut a bit of clay and roll it firmly to flatten the clay. Lift it and turn it so it doesn't stick to your work surface. Keep rolling until it is just a little thicker than the thickest setting on your pasta machine (that's a good time to get those thickness chips out to see how
thick it needs to be). Roll the clay through the pasta machine on it's thickest setting. Without folding or bending the sheet roll it through a thinner setting. And again without folding another thinner setting, the aim is to make a thin sheet as thin clay conditions faster. When you have thin sheet fold it and roll it and continue doing so until it is conditioned.
 Roll the clay through the pasta machine on it's thickest setting. Without folding or bending the sheet roll it through a thinner setting. And again without folding another thinner setting, the aim is to make a thin sheet as thin clay conditions faster. When you have thin sheet fold it and roll it and continue doing so until it is conditioned.
 This works but it is slow and I am impatient. Each slice is small and if you are using big amounts of clay it takes far too long. The secret I worked out at last is the initially rolling. If the clay is crumbly roll it more with the rolling pin first or you get crumbles in the pasta machine as shown (I hate that!). I try to short cut putting several sheets together but I think it is best to have them part conditioned first on reflection before bulking up. This is also basically the method recommended by Donna Kato herself and she should know!
Food Processor


I bought a little chopper just for clay. I found I could put about 2oz of clay in at a time without stressing the motor (getting horrible grinding noises) as long as I chopped them into pieces about 2x1x1cm. Run the chopper in bursts until the clay is lots of fine pieces. I then find it easiest to put the clay crumbs into a Ziploc bag and then roll them with a rolling pin in the bag. This helps the crumbs to stick together with no fear of loosing them. The clay is nice and warmed up by now and should go through the pasta machine no problem. A couple of rolls and it is ready to use.
 To be honest this is a fair bit of hassle too. It's great if you are colour mixing from a recipe as you can just put the parts in the chopper and it is more than half mixed already. I am buying big blocks of Kato the 12.5oz ones so will probably have a conditioning session at the start of a project using the chopper and then store the clay in sheets. They can easily be reconditioned by passing through the pasta machine.
The bottom picture shows what it looks like out of the Ziploc bag on the left and after first pass through the pasta machine on the right.
Jana whack
This is the method used by Jana Roberts Benzon. Basically you take your block of clay and whack it. Leave the clay in the wrapper and whack it with a hammer, rubber mallet, wooden rolling pin. Works pretty well and is a good arm exercise, tension reliever. Not ideal with those who have problems with hands/arms and it means getting stuff not in my clay kit out. You still have to do a bit of rolling to get it thin enough to go in pasta machine but no crumbs in sight!
(more info in an article at Polymer Clay Express )
Conclusion
Since I wrote this I have found that if I am colour mixing a fair amount of clay I use the chopper but other than that I tend to use the slice method cause as long as I roll well to start with crumbs are avoided and it saves getting extra kit out. I am using the big blocks of Kato so I do 1/4 block at a time - about 3 oz. This would be 3 slices so it isn't so bad.
Anyone else got any conditioning tips to share? I have heard people talk about driving over it with their car but that's a bit extreme for me I think!
Saturday, 24 April 2010
Friends spoons

I have been busy claying with friends today. I helped a friend and her children (aged 4 and 6) to make some spoons as a present for her mother. Here are the spoons the children made - pretty cool! I am sure their Granny will love them!

In the evening a friend popped round but I already had my mind set on making some faux turquoise so she made herself a spoon too (I had made one for her boyfriends birthday and she felt she needed her own special spoon too - her birthday is New Year's Eve so a way off!). It's very groovy! The rose on the end was inspired by a spoon my 4 year old daughter made a while back which had a rose on the end too.
It has been really nice claying with my friends and I have realised you can learn a lot by watching what other people do even if they are fairly new to polymer clay!
I am off to finish of my faux turquoise and I shall post some pictures later I hope. It's lovely and sunny here but I am suffering with my hayfever today :(
Hope you are all having a lovely weekend.
Cara
Thursday, 22 April 2010
Finally finished that bracelet
Thanks to those of you who commented on my bracelet either here or over at Polymer Clay Central (which you should check out if you haven't already. I only recently discovered it thanks to Anita (again check out here blog if you haven't already seen it http://melobeau.blogspot.com/)).
I tried a zillion things this afternoon, different sized beads, different colours, different combinations. Annoyingly I had been to the bead shop this morning but forgot to take my chip beads with me to try out. I bought some lime green and brilliant blue beads but none were quite right. i tried some copper spacer beads but the chips are fairly translucent and the copper seemed very heavy next to them. I decided that the chip beads needed to be in clusters, they looked a bit weird separated I think.
Nothing said " this is right " to me so I went for quick power nap. Whilst I was napping I had a dream of a snake of seed beads wrapping round my chip beads so took that as suggestion and went with it. Here it is.
I added a bit of chain on to make up the extra inch I needed (I have shortened it a lot since I took that photo) and used the spare chip bead to make a little dangly end. I quite like it. I have been wearing it this evening. My husband said he thought it was a bit boring but I don't rely on his judgement on things like these!
So much for just quickly stringing up the few trial beads I made!
PS I ought to add that I have noted how different the colours appear in my pictures - need to sort out the white balance I guess - it's a daytime, night time difference.
I tried a zillion things this afternoon, different sized beads, different colours, different combinations. Annoyingly I had been to the bead shop this morning but forgot to take my chip beads with me to try out. I bought some lime green and brilliant blue beads but none were quite right. i tried some copper spacer beads but the chips are fairly translucent and the copper seemed very heavy next to them. I decided that the chip beads needed to be in clusters, they looked a bit weird separated I think.
Nothing said " this is right " to me so I went for quick power nap. Whilst I was napping I had a dream of a snake of seed beads wrapping round my chip beads so took that as suggestion and went with it. Here it is.
 |
| Finished turquoise chip bracelet |
 | ||||
| Close up of finished bracelet |
So much for just quickly stringing up the few trial beads I made!
PS I ought to add that I have noted how different the colours appear in my pictures - need to sort out the white balance I guess - it's a daytime, night time difference.
Monday, 19 April 2010
Turquoise things and how to string?

It is from 'Make Jewellery' magazine issue 4
I started stringing those chip beads with the focal bead I showed you the other day. I find it difficult to see how things will look and have to string up a bit to see. I started off with just the chips but there wasn't enough (the problem of playing around rather than planning!). I then tried putting seed beads between each chip.


I took 3 lengths of tiger tail and using crimps fixed the focal bead in the centre (I used crimp covers cause I still haven't got round to buying crimping pliers yet). I then threaded 3 different strands with different beads, a mix of chips and 3 different colour seed beads - matt turquoise,silver and a shiny turquoise.

I then tried with 1 strand chips and 2 strands seed beads - didn't like it.

I then wondered if I should just go back to a string of chips with seed beads or silver/crystal spacers. Then I got all indecisive and decided it was time for bed (I am making an effort to go to bed early at the moment in the hope I will be less tired sometime!). So I will sleep on it but any thoughts about what you would do with it would be gratefully received.
Cara
Saturday, 17 April 2010
What I've been up to
I can't tell you about the main polymer clay project I have on the go as it is for my mum's birthday and she sometimes reads this blog. I'll tell you about it early May!
Whilst I was with family over Easter the kids, my niece and I had a quick polymer clay play. This is what I made having been reading Polymer Clay and Mixed Media-- Together at Last by Christi Friesen
The beads were inserted before baking. It was a bit rushed but I decided it was worth baking. I tried out a few others that I did scrap before baking. It's soft Fimo Soft hence all the finger prints. I didn't sand it but gave it a light patina with silver acrylic paint. Not sure what I will do with it now.
I am trying to be a bit more strict about not baking stuff I am not sure about it. If you aren't sure before it's baked that isn't likely to change once it is baked. Unbaked scrap is more useful than baked scrap!
I also gave the bead I made the other day a patina whilst I had the paint out...
 Not sure why I chose the light blue but it called to me when I went to my paint box. I think it works. I shall make this up into a bracelet with those chip beads I showed you a while a go.
I had another go at sanding those fopals a bit more too, I think they might come good with some more sanding, got fed up so will carry on another day.
I have a load of things I want to try out and lots of half finished things but the kids are back at school Monday so I hope to have time to do some.
Whilst I was with family over Easter the kids, my niece and I had a quick polymer clay play. This is what I made having been reading Polymer Clay and Mixed Media-- Together at Last by Christi Friesen
 | ||
| Fimo polymer clay flower with beaded centre |
I am trying to be a bit more strict about not baking stuff I am not sure about it. If you aren't sure before it's baked that isn't likely to change once it is baked. Unbaked scrap is more useful than baked scrap!
I also gave the bead I made the other day a patina whilst I had the paint out...
I had another go at sanding those fopals a bit more too, I think they might come good with some more sanding, got fed up so will carry on another day.
I have a load of things I want to try out and lots of half finished things but the kids are back at school Monday so I hope to have time to do some.
Friday, 16 April 2010
Holiday
You may have noticed I have been unusually quiet this last week. We have been on a holiday visiting friends and relatives all over the country. We live in the outskirts of Bristol which is a large city in the south west of England. We have been up to the highlands of Scotland and back over the last week which was great. The weather has been lovely and it has been really good to catch up with all the people we did manage to visit.
Home now and trying to catch up with emails, blogs, facebook, washing and hopefully before too long some polymer clay time!
Home now and trying to catch up with emails, blogs, facebook, washing and hopefully before too long some polymer clay time!
Monday, 12 April 2010
Pinched Petal Necklace from Color Inspirations
This is another exercise from Polymer Clay Color Inspirations: Techniques and Jewelry Projects for Creating Successful Palettes by Lindley Haunani and Maggie Maggio.
 I had trouble deciding on my primary colours as the Kato colour chips I made that matched colours in my collage were fairly equally split between red and magenta and also turquoise and blue so I put this project off for quite a long time. Also I was sure I wouldn't ever wear it so nearly didn't bother doing it at all. I opted for magenta in the end and made a custom 50:50 blue:turquoise for my blue, yellow was packet yellow.

I wasn't thinking very clearly and forgot to put the black and white skinner blend through the pasta machine on a thinner setting before I rolled it up. I didn't worry about it too much as I was just doing the exercise in case I learnt something rather than to make a necklace to wear.
I started cutting and forming the pinched petal beads. There were a lot!
I pierced the hole with a needle tool.
 I had left the cane overnight before slicing and some of the black and white skinner blend cane parts split a bit. I didn't worry about it too much as it was on the backs of the beads and I assumed you wouldn't see them. I found out that was wrong and you could see many of the backs so if you are making these make sure the backs are neat too!
 I started stringing them and couldn't work out if I was going to put them on alternately - one facing forward, one facing back or all the same way. I tried both and decided all facing forwards.
I strung them on tiger tail initially.

Didn't like the blip in sequence at the middle in the back.
 The two ends of the cane both had the same colours in and they didn't flow well so I took them off and reordered them so the colour flowed throughout the necklace in one circle. At that point I decided to restring them on Beadalon Elasticity so that I wouldn't have a clasp so it could be worn any way round. The holes were too small for the thicker Elasticity I have so I had to use the thinner one (must plan ahead more!).
 The finished necklace (well OK I took this before I had glued and trimmed the ends of the Elasticity).
I put it on and it felt quite nice so I left it on. I have worn it several times and am surprised to say I really like it! I thought it would be a bit 'too much' but it is very flexible it goes with most of my wardrobe!
Only problem is the weight of the beads is too much for the thin Elasticity and it has stretched. Guess I will have to restring it on the thicker stuff after I have enlarged all the holes.
Just goes to show you should try things, you might like them more than you think!
 I had trouble deciding on my primary colours as the Kato colour chips I made that matched colours in my collage were fairly equally split between red and magenta and also turquoise and blue so I put this project off for quite a long time. Also I was sure I wouldn't ever wear it so nearly didn't bother doing it at all. I opted for magenta in the end and made a custom 50:50 blue:turquoise for my blue, yellow was packet yellow.
I wasn't thinking very clearly and forgot to put the black and white skinner blend through the pasta machine on a thinner setting before I rolled it up. I didn't worry about it too much as I was just doing the exercise in case I learnt something rather than to make a necklace to wear.
I started cutting and forming the pinched petal beads. There were a lot!
I pierced the hole with a needle tool.


I strung them on tiger tail initially.

Didn't like the blip in sequence at the middle in the back.


I put it on and it felt quite nice so I left it on. I have worn it several times and am surprised to say I really like it! I thought it would be a bit 'too much' but it is very flexible it goes with most of my wardrobe!
Only problem is the weight of the beads is too much for the thin Elasticity and it has stretched. Guess I will have to restring it on the thicker stuff after I have enlarged all the holes.
Just goes to show you should try things, you might like them more than you think!
Friday, 9 April 2010
Soft Fimo Soft - now I understand
Since I switched to Kato clay I was finding Fimo impossible to work with. I have said to several people, " Wierd how I use it and loved it for so many years and now find it just horribly sticky and soft and impossible to work with." I assumed it was just becuase I had got used to the firmer Kato.
However a recent article on http://paroledepate.canalblog.com/ made me realise it wasn't me it was the clay! Staedtler have a facebook fan page and it is full of complaints from people saying the Staedtler brand blocks are too soft.
Although I have some older blocks of Eberhard Faber branded Fimo I had bought a load of new blocks which were Staedtler at the same time I bought my first Kato clay. So when I swapped to using Kato (which as I am sure you all know is a very firm clay) I also swapped to ridiculously soft Fimo. It also explains why the Fimo Classic I bought was no firmer than the fimo I was used to.
Thursday, 8 April 2010
A different play dough way
Whilst having a stroll through flickr and admiring the work of Fimolare I came across this photo showing the play dough no background reduction technique (as developed by Idit Zoota). The packing is done with the play dough and just a wrapping of scrap clay.
This is different from the way I have tried it which is to use a thin sheet of playdough just to separate the cane from the scap clay and then pack with the scrap clay. Hmm my experimenting brain is thinking of trying some different ways - if I can stand the mess of cleaning up! Also this was done with home made playdough - I found it didn't work for me with Fimo but I am thinking perhaps I could make a stiffer more basic dough missing out some of the ingredients used to preserve such as the cream of tartar after all I am not going to be keeping it ....
Fimolare also has some good advice on cleaning up - suggesting separating the scrap clay and the cane and then holding them under running water to remove the bulk of the playdough before putting in separate pots of water. Also to change thewater regularly - makes sense to help the playdough dissolve as once there is a lot dissolved in the water it may become saturated and no more can dissolve.
Unfortunately it is the school holidays and I am busy with my family so the clay experimenting will have to wait - I'll let you know as soon as I have any findings to report.

Here are a couple of flower beads I made using this technique
Tuesday, 6 April 2010
Mokume Gane and Belated Easter Eggs
I had a go at Mokume Gane again the other day. I often see things I love made with the Mokume Gane technique and I have read several tutorials but never come up with anything that has made me go 'Wow!'. I think next time I shall take a tutorial to the work bench with me and try and follow it more directly and use the same colours too.
I used Fimo (trying to use up my stash) in white, gold, and translucent and also used a
sheet of gold foil, first time I have used metal foils. I made a stack of the different colours and then rolled them through the pasta machine and cut in half a restacked and then cut in half and restacked again so I had 12 layers of clay. I used my sculpting tools to impress balls and circles of different sizes and made needle tool dot patterns and filled in some of the larger patterns with small balls of gold clay.
I then took slices with a tissue blade and laid them on a sheet of white clay. I did try shaving slices with an old potato peeler (a tip I read on someones blog - can't remember who sorry) but it was too blunt - I will have to get a new one to try it. It worked out OK, it's quite interesting but again no wow factor for me - but then I don't really like gold so not sure what I was thinking there!
I hadn't really planned anything with it so I covered a spoon, you may have realised that's one of my default activities by now ;) What should I do with the rest? I cut out a few pendants but didn't like the shapes, I must spend some time making myself some cardboard pendant templates instead of randomly cutting things that are uneven or unbalanced or too wide...
I decided to cover an egg for my lovely husband for Easter (this was the Thursday before - I like a tight deadline!). I blew a real egg - phew had forgotten what hard work that was having not done it since I was a teenager! I thoroughly washed the egg and then dried it in the oven for a good long time.
I read several tutorials on covering eggs and tried a few with some scrap clay, but I kept getting bits that were much thicker and ruined the shape of the egg. In the end because the pattern of the Mokume Gane was random and could take overlapping without ruining it I just wrapped a piece round most of the egg and tore bits off to fill the gaps left.
I just rolled it around in my hands to smooth it

I was quite pleased with it at this stage and made a matching stand and put it in the oven to bake. Excellent, Easter sorted for my husband at least.
Well that was until I got it out of the oven - the one thing I forgot, probably the most important thing, the thing that I was conscious of trying to remember until the last minute - the air hole! The result...
Without the air hole as the air in the egg expanded in the heat of the oven it had nowhere to go - it expressed itself in a series of 'warts'. The stand was also too big. No time to do anything else so I gave it to him anyway, he was kind of grateful I had made the effort I think. I love the feel of it though it is so light. It would be awesome if I could sand it smooth and buff it to a shine. I will have a go again sometime, another thing to add to my polymer to try list!
Anyway I hope you all had a great Easter. We had a lovely time at my in laws
I used Fimo (trying to use up my stash) in white, gold, and translucent and also used a
sheet of gold foil, first time I have used metal foils. I made a stack of the different colours and then rolled them through the pasta machine and cut in half a restacked and then cut in half and restacked again so I had 12 layers of clay. I used my sculpting tools to impress balls and circles of different sizes and made needle tool dot patterns and filled in some of the larger patterns with small balls of gold clay.
I then took slices with a tissue blade and laid them on a sheet of white clay. I did try shaving slices with an old potato peeler (a tip I read on someones blog - can't remember who sorry) but it was too blunt - I will have to get a new one to try it. It worked out OK, it's quite interesting but again no wow factor for me - but then I don't really like gold so not sure what I was thinking there!
I hadn't really planned anything with it so I covered a spoon, you may have realised that's one of my default activities by now ;) What should I do with the rest? I cut out a few pendants but didn't like the shapes, I must spend some time making myself some cardboard pendant templates instead of randomly cutting things that are uneven or unbalanced or too wide...
I decided to cover an egg for my lovely husband for Easter (this was the Thursday before - I like a tight deadline!). I blew a real egg - phew had forgotten what hard work that was having not done it since I was a teenager! I thoroughly washed the egg and then dried it in the oven for a good long time.
 |
| A sheet of mokume gane and a covered but not smoothed egg |
I just rolled it around in my hands to smooth it

I was quite pleased with it at this stage and made a matching stand and put it in the oven to bake. Excellent, Easter sorted for my husband at least.
Well that was until I got it out of the oven - the one thing I forgot, probably the most important thing, the thing that I was conscious of trying to remember until the last minute - the air hole! The result...
 | |||||
| Egg with warts! |
Anyway I hope you all had a great Easter. We had a lovely time at my in laws
Sunday, 4 April 2010
Google Reader to help you find stuff!
I am fairly new to blogging (making up for lost time though ;) I use blogger cause it works well with my other google stuff such as Picasa web albums, that was were I got started, wanting to share some photos with friends and spotting the blog it button on Picassa.
I love people's blogs, they are such a great source of information and inspiration and they help me feel connected to the world (particularly whilst I have been pretty much stuck in the house of late recovering from surgery on my foot). I currently follow 134 blogs (although it will probably be more than that by the time you are reading this!) and at the moment have time to read most of the new posts. Soon I will have to start doing normal things like school runs, shopping, cleaning, cooking and I will have less time so unfortunatley will have to be more selective.
I frequently come across a post in a blog and think I must remember that, or a tutorial and I think wow I want to have a go at that but how do you get organised to find it again?
Luckily I have found a solution - Google Reader - thanks to a post on one of the blogs I follow - http://craftbloguk.blogspot.com/2010/03/how-to-manage-blog-following-with.html This is one of the blogs I would love to go back and read some of the previous posts on as there is loads of great advice about running a craft blog, mainly aimed at people who sell their work, I guess that will be me one day.
So Goggle reader lets you organise the blogs you follow and also star and tag posts. I have only just started with it but already I have gone back and found a couple of things I really wanted to try out and starred them and tagged somethings with - want to try it. Now I should be able to find them again - hurrah!
Also you can search, so when I wanted to find that tutorial I saw a while ago for an Easter basket I did a search and was able to find it quickly - rather than the old days... "hmm what blog did I see that on again?" and hours of searching. I am loving this Google Reader!
Just need to find time to try all these things now.....
Saturday, 3 April 2010
Polymer Clay Tumble Chips
(I really wanted to show you my polymer clay covered Egg (warts and all) I made but the pictures are still in the camera and the camera isn't with me - I'll show you after Easter - late rather than timely but never mind. In the meantime I shall catch up with some other things I have been up to.)
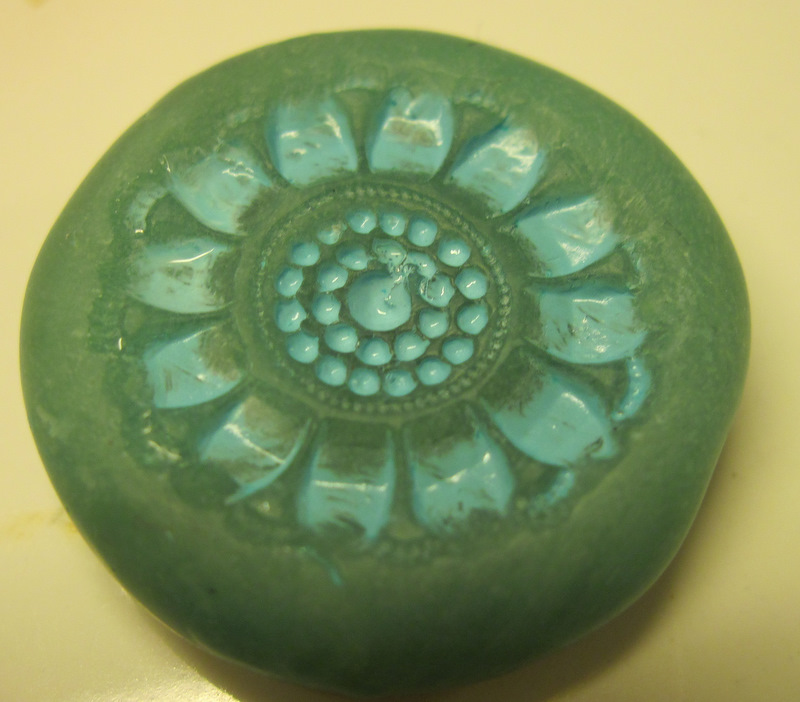
 You may recall a while ago I posted a picture of a polymer clay prototype I made for a flower pendant I intend to make in PMC. Here it is again .
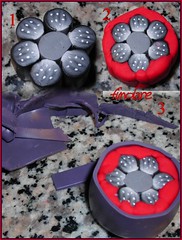
I saw a project in a jewellery magazine and it had a Thai Hilltribe silver pendant that looked like this strung with turquoise and amazonite gemstone chips . I suddenly had the inspiration the other day that I could make my own faux turquoise chips. I haven't tried any faux techniques yet, there are several on my polymer clay to do list (which is about 3 pages long ;)
I had some translucent clay out the other day and had a bit left over and a spare few minutes so had a go at making some chip beads just to see how they would work out. I used a bit of blue alcohol ink mixed in and they came out looking quite a lot like the amazonite chips used in the necklace project.

The central bead was a ball that I squashed and then imprinted with a textured button, a different one on each side. I need to add some sort of patina or something to bring the pattern out, again I haven't done any surface effects after baking so that will be another round of experimenting another day (all tips or ideas welcome for that!).
So I will have a go at the faux turquoise soon and will perhaps make some more of these - just making some variations in the colour a bit to make them look more natural. Think I will just not mix the ink so thoroughly. Then I can string a complete polymer prototype (hmm wonder if I would ever get round to making the real thing...)
Hope you all have a great Easter. I taught my kids (nearly 6 and just turned 4) to sew this week and they love it. They have made presents for everyone from some brightly coloured felt. I have been crocheting (to fill the gaps when I can't clay) chrysanthemum dishcloths for everyone which are probably too pretty for dishcloths but hey...
 You may recall a while ago I posted a picture of a polymer clay prototype I made for a flower pendant I intend to make in PMC. Here it is again .
I saw a project in a jewellery magazine and it had a Thai Hilltribe silver pendant that looked like this strung with turquoise and amazonite gemstone chips . I suddenly had the inspiration the other day that I could make my own faux turquoise chips. I haven't tried any faux techniques yet, there are several on my polymer clay to do list (which is about 3 pages long ;)
I had some translucent clay out the other day and had a bit left over and a spare few minutes so had a go at making some chip beads just to see how they would work out. I used a bit of blue alcohol ink mixed in and they came out looking quite a lot like the amazonite chips used in the necklace project.

The central bead was a ball that I squashed and then imprinted with a textured button, a different one on each side. I need to add some sort of patina or something to bring the pattern out, again I haven't done any surface effects after baking so that will be another round of experimenting another day (all tips or ideas welcome for that!).
So I will have a go at the faux turquoise soon and will perhaps make some more of these - just making some variations in the colour a bit to make them look more natural. Think I will just not mix the ink so thoroughly. Then I can string a complete polymer prototype (hmm wonder if I would ever get round to making the real thing...)
Hope you all have a great Easter. I taught my kids (nearly 6 and just turned 4) to sew this week and they love it. They have made presents for everyone from some brightly coloured felt. I have been crocheting (to fill the gaps when I can't clay) chrysanthemum dishcloths for everyone which are probably too pretty for dishcloths but hey...
Thursday, 1 April 2010
Clayworks by Kim Detmers Tutorial
Kim Detmers has kindly shared a tutorial on her blog of how to make this lovely Spring Bouquet. Check it out here http://claybykim.blogspot.com/p/tutorial.html


Flower pendant
I have been meaning to make some texture plates for a while (I don't have any) but got a bit distracted and ended up making a flower stamp instead.

I carved the one on the right (and baked it) and the one on the left is an impression taken from it which has been trimmed. They are both made in scrap clay.
I then got out the Fimo Silver Powder I bought a few years ago but still hadn't used. I covered the flower with it and used some Fimo Deko Gel mixed with some alcohol ink to fill the surface. It needed varnishing to protect the silver powder and at that time I only had the Fimo varnish. I wasn't very happy with the finish and that prompted the search for the 'Future' equivalent.


It was also one of the first times I had used the Deko Gel and the alcohol inks are a new addition (bought for the glow in the dark jelly roll cane) so all in all this was a lot of new stuff for me. It's in my box ready to be given a lease of life....
Subscribe to:
Posts (Atom)


