
There are hundreds of polymer clay tutorials out there on the internet, some you pay for ( in my experience these are excellent, the authors have put in much more time and they are very detailed) and many are free. There are lots of creative and generous artists out there! Some people have kindly collected the tutorials together onto pages of links and I would like to share a couple of these with you now so perhaps you can find a new tutorial to play with.
http://www.everclay.dk/1_Tutlinks/tutlinks_US.htm is a very organised and comprehensive list of links
http://beadyeyedbrat.com/polymerclay.html has a whole host of links both under 'Our Clay Tutorials' and 'Tutorial links' again they are well organised and comprehensive.
Not forgetting of course the wonderful http://www.polymerclaycentral.com/ . That link will take you to the master index of projects but there is a whole host of other things that are great about PCC - if you haven't been to the forum yet you should!
Monday, 24 May 2010
Sunday, 23 May 2010
Variation is the splice of life....
My favourite necklace right now is my spliced flower cane one that I made recently with the matching bracelet.
 |
| one of the spliced flower cane beads |
I decided to play about with the spliced flower technique to see what would happen.
I turned them inside out (I normally put the white in the center)
 |
| the starting skinner blend logs rolled so the white is on the outside |
 |
| the restacked logs after first bit of squashing |
 |
| The finished flower |
 |
| Using a couple of offcuts of 3 colour skinner blends |
 |
| Here are the skinner blend logs before cutting into quarters |
 |
| skinner blend logs cut and stacked ready to be squashed |
 | |||||||||||||
| The end result |
Saturday, 22 May 2010
Colour scales

This was my first go with the colour scales exercises. I enjoyed doing them and they didn't take as long as I thought they might. I can see I will be doing some more with the other Kato package colours.
 |
| Kato blue to green and yellow to magenta colour scales |
Friday, 21 May 2010
Bam Bam Bracelet
I recently bought the bam bam bracelet tutorial from Tina Holden. I finally got a chance to try it out yesterday, a bit of a bracelety day. Again I can't say much about what I did - you'll have to get the tutorial yourself! It is very comprehensive and is broken down into lots of tiny steps.
 I am wearing it now, it fits! I didn't break it! I think I shall take what I learnt from this back to the Scrap MG bracelet for attempt 3! Thanks Tina it's a great tutorial.
I think when I make another one I would put beads between the 2 sections (it's one of the options there are instructions for in the tutorial) as the joins are quite obvious (they were better before I sanded them!) and the beads would make it look like part of the design.

I think when I make another one I would put beads between the 2 sections (it's one of the options there are instructions for in the tutorial) as the joins are quite obvious (they were better before I sanded them!) and the beads would make it look like part of the design.
Thursday, 20 May 2010
Shiny Happy People
I can now buff to a glass like shine!!!! I am very happy!
Thank you to my husband for buying the new Dremel and Workstation, Desiree for her tutorial on making a better buffing wheel, my children for donating the cotton muslin (stole one of my son's comforter cloths - well he is nearly 6 now and doesn't really use them any more and he does have several - I am not that mean a mum!) and all the other clayers who have given me advice on blogs, in forums etc....
Here's what I did....
 |
| handmade cotton muslin buffing wheels |
 |
| 2 buffing wheels mounted on standard dremel spindel |
 | |
| Dremel mounted on the workstation (the stuff in the back is my husband mending his bike in the dining room so we are 'together') |
 |
| After buffing! Lost a few threads! I look like I am covered in yellow fluff! |
 | ||||||||||||||||||||||||||||||||||||||||||||||||||||||||||||||||||||||||||||||||||||||||||||||||||||||||
| Top one is my hand buffed spoon, the bottom one was hand buffed and has now been made even more shiney with the dremel. Hard to see in photos but the difference is very clear to the eye. Dremel buffed is twice as shiny! So where next? Need to sort out some wire for holding small beads for buffing. I shall try making some more buffing wheels - will try a tighter woven fabric in the hope I loose less of it! Going to see if I can squeeze another on the dremel mandrel - will probably try making a modified mandrel as suggested by Desiree. Oh and I shall be rebuffing all my things to make them even shinier! |
Scrap MG bracelet attempt 2
I decided to have another go with the Scrap MG tutorial I bought from Tonja Lenderman, you can get yours here. I would recommend it Tonjas bracelets are beautiful and her instructions are clear, a great way to turn a pile of scrap into something beautiful.
I made one before which was beautiful but far too big and then I was careless and broke it. I can't tell you too much about what I did as obviously that wouldn't be fair to Tonja but this time I measured the widest point of my hand and measured the bangle to be the same size.
I was pretty pleased with how it looked. The colours came out a bit subtle compared to my normal colours but I thought it would go brilliantly with my new grey T- shirt with lots of coloured patterns - very similar to the bracelet. I went to try it on - wouldn't ft! But I measured! I tried again ...
It was too small and I pulled it apart along the join which I had smoothed over but clearly not well enough. So back to the drawing board with bracelet measurements. I will see if I can super glue this one to give to someone with smaller hands!
I feel a bit like Goldilocks, the first one was too big, the second one was 2 small, lets hope the 3rd one will be just right!
I made one before which was beautiful but far too big and then I was careless and broke it. I can't tell you too much about what I did as obviously that wouldn't be fair to Tonja but this time I measured the widest point of my hand and measured the bangle to be the same size.
 |
| Starting pile of scrap |
 |
| The finished Scrap MG Bracelet - the one on top, subtle colours |
 |
| OK so it really wouldn't fit over my hand :( |
I feel a bit like Goldilocks, the first one was too big, the second one was 2 small, lets hope the 3rd one will be just right!
Tuesday, 18 May 2010
Faux Turquoise so far
I tried one of the methods of faux turquoise where you chop the clay (I used my blender) and then reform it, painting on black acrylic paint after baking then sanding so that the black remains in the cracks.
I tried sanding before the black paint was completely dry (it seemed dry on the outside but was still a bit wet in the cracks). This meant the black was a little washed off and the cracks quite deep. I wanted to sand the larger beads and the spoon (there always has to be a cutlery handle somewhere ;) flat and smooth so would need to fill the cracks in with black. I need to go back and try adding some more paint and letting it dry properly this time! I also wondered about mixing some paint with some liquid kato. I'll try and have another go later in the week and let you know how it worked out.
I thought I would give the other method I know a go too. You chop the clay the same but apply black acrylic paint before forming and baking. Unfortunately my bead fell apart whilst sanding :( The instructions said to let the paint dry but on reflection they then used the black chips to cover a clay core and I just mushed some together. I guess they may have stuck to the clay core but didn't have enough stick to stick to each other due to the paint.


Watch out for my next attempt to master the faux turquoise!
 |
| I used my turquoise ring to match the colour and decided it wasn't a uniform colour so made a shade and a tint of my original turquoise colour, chopped them all in the food processor |
 |
| I combined all the colours and grated some cured black clay to add as the inclusion |
 |
| I formed some chip beads from a small pile of clay and rolled in in the black clay gratings I had spread out with a paint brush so there weren't too many on each bead. |
 |
| Forming a large coin bead using a solid clay core |
 |
| The coin bead covered |
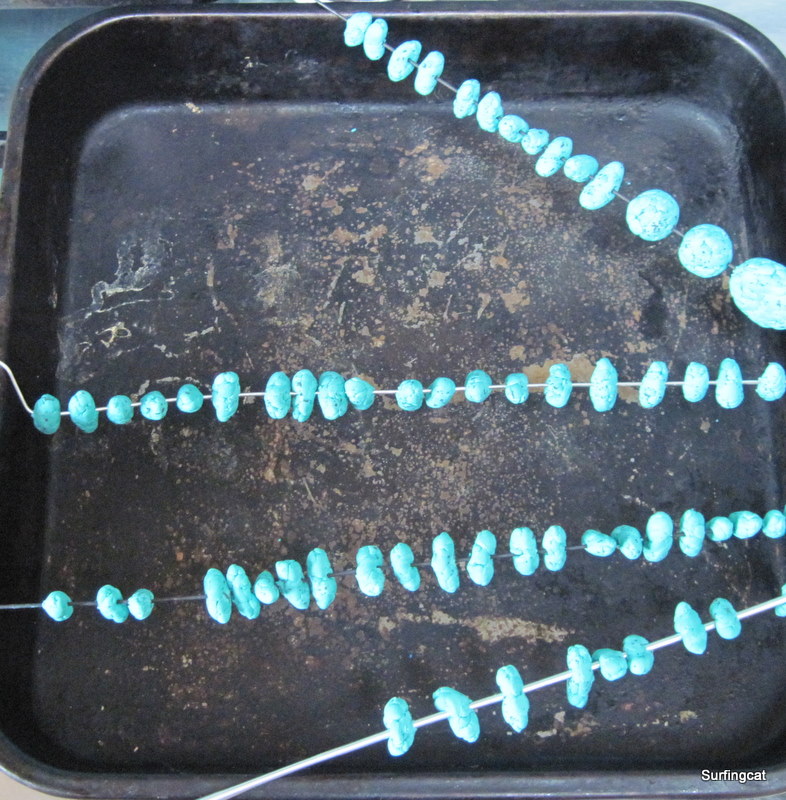 |
| Baking the beads (I decided I needed to get some proper wires sorted when I took this picture!) |
 | ||||
| A chip bead baked and covered in a layer of black acrylic paint. |
 |
| Close up of faux turquoise chip bead after painting and sanding |
I tried sanding before the black paint was completely dry (it seemed dry on the outside but was still a bit wet in the cracks). This meant the black was a little washed off and the cracks quite deep. I wanted to sand the larger beads and the spoon (there always has to be a cutlery handle somewhere ;) flat and smooth so would need to fill the cracks in with black. I need to go back and try adding some more paint and letting it dry properly this time! I also wondered about mixing some paint with some liquid kato. I'll try and have another go later in the week and let you know how it worked out.
 |
| Faux turquoise selection |
I thought I would give the other method I know a go too. You chop the clay the same but apply black acrylic paint before forming and baking. Unfortunately my bead fell apart whilst sanding :( The instructions said to let the paint dry but on reflection they then used the black chips to cover a clay core and I just mushed some together. I guess they may have stuck to the clay core but didn't have enough stick to stick to each other due to the paint.


Watch out for my next attempt to master the faux turquoise!
Monday, 17 May 2010
Textured Beads, mini tutorial
I'd love to show you how I got this great texture over on my new blog - you can find the post here
http://www.carajane.co.uk/2010/05/textured-beads-mini-tutorial.html
Look forward to seeing you at www.carajane.co.uk
http://www.carajane.co.uk/2010/05/textured-beads-mini-tutorial.html
 |
Monday, 10 May 2010
new toy
My husband has bought himself a new dremel because he needs it to do something in the loft, it's a posh cordless one! When he was ordering all the bits he needed he also ordered a dremel workstation for me (he has been in charge of drilling holes in beads so far). So the quest to master dremel buffing will resume but should be easier cause I can use both hands. Any tips for using this set up gratefully recieved.

Friday, 7 May 2010
New set
I made myself a new necklace to go with some new clothes my mum kindly bought me. I have another one planned with a series of different beads but need to make some more green flower canes first. I was having trouble getting texture on my beads but with help from some friends on Poymer Clay Central and Flickr I am now happy with them. I used my nutmeg grater in the end to get the texture (need to get a new one now before I need nutmeg again but clay is more important ;)
I am going away for a girly weekend and have my lovely new outfit on and feel very smart with my coordinating jewellery! Have a good weekend all.
 |
| Necklace and bracelet set |
|
| Close up of spliced flower cane bead and the textured beads. |
I am going away for a girly weekend and have my lovely new outfit on and feel very smart with my coordinating jewellery! Have a good weekend all.
Thursday, 6 May 2010
Dorset Fruits cake forks finished
Finally got round to photographing these cake forks. They are a bit different from my normal style being made to match my sister in laws crockery (not the same one who got the paisley cake forks in case you were wondering).

They are being delivered at the weekend, I hope she likes them!

They are being delivered at the weekend, I hope she likes them!
Tuesday, 4 May 2010
Crochet hooks
Happy birthday mum!
She has already opened these so I can now show you what I have been busy doing. I didn't give her all these, mum got the four on the right, the larger sizes as I knew she already had many of the smaller ones. I am using the blue one in the middle and it is lovely to work with. So much nicer to hold than the plain aluminium handle.
 I've been busy but look forward to having a bit more time to blog again soon.
Cara
She has already opened these so I can now show you what I have been busy doing. I didn't give her all these, mum got the four on the right, the larger sizes as I knew she already had many of the smaller ones. I am using the blue one in the middle and it is lovely to work with. So much nicer to hold than the plain aluminium handle.

Cara
Subscribe to:
Posts (Atom)


