Friday 25 February 2011

CPAW8 work in progress

It's the children's school holiday week so not much clay time for me. I did manage to sneak in a quick hour this evening in order to keep up with the Color Palette a Week Flickr group . I had lots of ideas but not enough time to fulfil them so I opted for some quick things. Here's what I've made, the sanding and finishing will have to wait til next week. I will try and remember to show you the finished items.

This weeks colour palette - back in my comfort zone ;)

Striped jellyroll cane covered oval cabochon pendant, domed disc pendant (getting good mileage out of my light bulbs  at the moment ;) and 2 small cane slice beads which will become earrings.

There's no black in this mokume gane and the dark purple isn't really showing in these bits. Not sure if I will leave them as they are or do something more to them. 

The mokume gane shavings on a sheet of black, domed disc pendant. This is probably my favourite at the moment.

Wednesday 23 February 2011

GIVEAWAY!!

It's time for a giveaway! There are now 100 lovely followers for this blog - amazing!
 Thank you all for reading my ramblings.

To enter the give away simply leave a comment below, making sure I have means to contact you should you be a winner (easiest way is of course to be a follower).

 The winner will be drawn on Monday 14th March by random number generator.

They will win this lovely necklace!


Posted by Picasa


Should there be more than 100 comments I will add another prize. Everyone is welcome to join in, friends, family (yes even you mum!), followers, people new to my blog.....

Good luck!
Cara

PS If the number drawn out is for someone with no contact details I will draw another

Saturday 19 February 2011

Colour Palette Challenge - week 7 - coffee

Being as I am working on my mokume gane technique at the moment I used this weeks colours from the Color Palette a Week Flickr group to play about with it some more.  You may I have seen the sheets I made, here's some of the jewellery I have made. Got some beads too but I haven't polished or strung them yet.

Textured domed disc with a centre from the stamped mokume gane sheet

Domed disc pendant made with the shavings from the stamped mokume gane, it has such a different feel to it

Pendent made up of 2 oval pieces, one plain colour the other mokume gane. 
I am half way through a series of blue, turquoise and green mokume gane pendants. Can't wait to show you but I will have to as it is the kids school holidays and we are busy, busy, busy! Hope you all have a good week.

Remeber these extruded stripey beads?

A while ago I posted a tutorial for making these beads


It never really occurred to me that people actually used it until recently when someone commented on another post to say thank you for the tutorial. If you have tried it out - how did it work for you? Did you get the crumbles? I haven't tried it with new formulation Kato yet, I might need to do some leaching to get it to work.

If you have photos of beads you made can I see them? I've only made them in brown and green for some unexplainable reason. Would love to see other peoples versions - everyone always adds their own twist to things. Leave me  a comment with a link - or mail them to me (there's an email me link in my profile).

I find this blog fun, and it helps me focus and think about things a bit more than I might otherwise (sometimes anyway ;). I love it when people leave comments so please do if you have the time. I am often guilty of reading things and not taking the time to comment when I have something to say but I know how much I appreciate it when people do.

Only 2 more followers to go before I launch a giveaway of some jewellery. I shall have to go and decide what the prize/prizes are going to be! Thanks for reading

Cara x

Friday 18 February 2011

Mokume gane - again....

You can read my article about the mokume gane and how I mastered it here - http://www.carajane.co.uk/2011/02/mokume-gane-again.html on my new blog - www.carajane.co.uk
Successful mokume gane sheet!

I used the shavings on sheet of scrap clay and love this too!
I

Thursday 17 February 2011

Texture in shapes

Whilst making up some pendants I thought I would be clever and try and do 2 jobs at once. Well it didn't work out how I thought but I quite like what happened.

I wanted to make a circular pendant with a textured back, I decided to cut out the circle whilst the clay sheet was over some rough sandpaper thinking it would get textured as I cut. As usual once I saw what happened it was obvious that's what would happen but you don't always think about these things late at night.

I picked up the sheet and discovered that of course it didn't texture the whole back as pressure was only applied to the area that the cutter was pressing on. But I think this could be quite a neat thing to do - texture in shapes. I'll play around with it.


PS I am going to have a giveaway when I get to 100 followers - only 7 more to go

Sunday 13 February 2011

This weeks colour palette creations

In my last post I told you about the Color Palette a Week Group on Flickr. Well here is this weeks colour palette - it's bright and I didn't think I liked it but you have to try these things.
I mixed up the colours with some pearl clay included to make them a little softer and because I was in a shimmery type of mood. I also used the opportunity to try out some of the things on my 'want to try' list.

Here's what I made

Thin stripes, yes all 3 colours are in there but it's hard to see the pink especially. I wasn't sure how to string the donut type pendant other than the obvious way which I am not overly keen on. Tried it on black buna cord, black suede,  grey suede and pink rattail before I decided perhaps red looked best as it saved introducing another colour.

This is a very experimental piece. I finally tried using metal leaf for crackles and I think you will be seeing more of that! The top part is a Sutton slice which worked beautifully thanks to the tips in Lisa Pavelka's -The Complete Book of Polymer Clay, I used another of her texture stamps to do it, the back is textured with the same stamp btw. I then tried out using a layer of  liquid polymer clay as a varnish/protective layer over the gold crackles. I baked the piece as normal and the liquid clay was still a little milky so as recommended by Donna Kato I got the heat gun on it and wow - before my eyes it transforms to become clear and shiny.  I'm not sure you will see a piece quite like this again but I will be using all those techniques some more. I didn't like this at all when I first made it, it was a playing about piece but now it's growing on me and I almost like it.

A hollow oval donut  in mokume gane. These colours don't really suit mokume gane as there isn't enough contrast but it is a technique I am keen to improve. I thought after I had stacked them a second time - should of put another colour in to lift it but it was too late by then. I rescued the rest of the clay I had stacked to make the striped pendant above. I see so many stunning examples by other people and am never really that happy with mine. The Lisa Pavelka texture stamps are better to work with than most of the other stamps I have as they are deep so you get a good impression.  I look forward to wowing you with something stunning one day.
Whilst shaving the mokume gane I created a pile of shavings which looked rather appealing, they became this funny little pendant, another one I'm not totally sure about but it's different!


So nothing I am totally in love with, they aren't my colours but they did make me push some boundaries and try some new things so it was a worth while exercise. If nothing else the scrap clay from the 3 colours together makes a lovely red!

Friday 11 February 2011

Colour Palette Challenge

I thought about taking part in a Thing a Day challenge this year but decided I would only get behind and frustrated when life got in the way. The last couple of weeks I've had plenty of creative time but January I didn't really touch my clay at all :(


I did however happen across a Flickr group (I watch Flickr instead of TV these days, much more inspiring) called Color Palette a Week . Every week Chris who started the group posts a palette of colours and the idea is that people create something using that palette then share it with the group. I tend to stick with similar colours and I have been thinking for a while that perhaps I should 'design' my pieces of jewellery using a palette of colours rather than just picking up what I feel like so this seemed like a good challenge. I was slow to get started but finally posted my first item to the group (2 weeks late but... I started it in the right week).


My creation

The colour palette for week 4 - based on the Mystery  Machine (the van from Scooby Do)


I made a Skinner blend from all four colours in the palette but the pendant would of been giant to fit them all in so I lost most of the turquoises, should of thought about what I was doing before I started but I just mixed up the colours and decide to blend them. As it is it's 7cm across! 

The Art of Jewelry: Polymer Clay: Techniques, Projects, Inspiration

made it using the instructions by Mari O'Dell for an Art nouveau pendant in the book 'The Art of Jewellery - Polymer Clay by Katherine Duncan Aimone.


I used black acrylic paint mixed with liquid clay for the black pattern and it blistered in the oven which is why the black pattern looks a little odd. Pattern is a Lisa Pavelka texture stamp.

I am working on this weeks palette, I have made several things just need to get them sanded and strung. I seem to be a bit manic at the moment with the blog but I have had some clear creative time so am making the most of it. I was claying in the middle of the night last night as I am having trouble with a tooth and couldn't sleep. I'll share some pictures later.

Thursday 10 February 2011

Chokers oven friendly!

Whilst I was ordering some more chokers I saw bracelets the same, nylon coated wire with a screw closure. I am often asked to make matching bracelets for my floating wire necklaces which is a problem as I don't think floating wire bracelets work so I normally add more beads as shown below. I realise as I write this I haven't actually tried a floating bead wire bracelet - hmm perhaps I should. Any other suggestions welcome.

Wire floating bead necklace
Bracelet to match necklace (had to get creative to make the pattern repeat neatly to the size required) on elastic


I wondered if the choker bracelets might be the answer. When they arrived I realised they had a different screw fitting, a textured one rather than the plain smooth barrel and I didn't like the look. My first thought of course was - I'll cover it with clay. But would the nylon coating on the wire be OK? I tested it and the answer is yes! I wanted to try it out so made a quick bracelet - not very happy with it as a bracelet but it's something to work from.
Nylon coated wire bracelet with screw closure (the one on the right on it's own is the covered screw barrel)
I had to make the hole in the beads reasonably large to fit over the screw fixing. They are larger than the covered screw barrel, I was in a rush and not thinking about it too much. It would probably be easiest to make the barrel covering a feature rather than trying to blend it in to the beads. I am not sure how you would secure them? Might try baking some right onto the wire next. You would need to secure at least one at the end or every time you took it off they would go flying everywhere! So something else on my list of things to try....

What will I make next?

I have so many ideas of things I want to make with polymer clay my head has't got room for much else! I am in such a creative place at the moment that jewellery designs just pop into  my head all the time (especially in bed trying to sleep it would seem). I am not complaining about this but I do wish I had more time available to play with my clay so I could make them all before the ideas fade (I've tried writing/drawing them but it seems to kill the idea rather than preserve it for some reason). I am enjoying my curved disc shape at the moment and want to make one that mimics a summer sky and I want to make a necklace with several discs.

There are also a loads of techniques I want to try - there are just so many possibilities with polymer clay! Some at the top of my list are;

  • Watercolour technique
  • Making my own texture plates
  • Using liquid polymer clay as a varnish (heat gun after bake)
  • Mokume gane, sutton slice and mica shift - have tried these but still not perfected
  • Making polymer necklace closures
  • Using mica powders
  • Crackles


I also really want to play with resin coatings but that means investing in a UV light, maybe once I have had a few more successful sales!

I also have some experiments to do. I am keen to do some baking  trials as I commented at the London Polymer Clay Group that you couldn't bring fimo to a glass like shine like you could Kato and then on the way home remembered Carol Blackburn's fabulously shiny fimo bowl from the previous meeting- which had just been sanded and did have a glass like shine. I have a feeling that perhaps I don't bake my fimo things long enough, thus they don't polish so well - only one way to find out....

I am going to spend some time in the next couple of months playing with these ideas, actually using some of the books and tutorials I have instead of just looking at them. I am also going to try and imitate the style of some of my favourite pieces of jewellery by other polymer clay artists to get a feel for their technique and to further develop my skill.

I look forward to sharing the results with you!

Monday 7 February 2011

My workspace and my new friend

When I first started my polymer clay journey I was working on the kitchen table. It was a pain having to get everything out and pack away again, often a few short hours later when my daughter was at preschool. Before the children were born I had a craft room, but it had become a playroom. Mention of the desire to move house so I could have a craft room again got my husband worried and we found a solution. We put my old craft bench back in the playroom with a set of shelves above and a chest of drawers below to store all my stuff. The kids don't mind because often they play clay with me!

Me and my children making polymer clay jewellery together
It is normally a chaos of half finished things and things I am not sure where to put, I am not the neatest person and I always seem to have something I just have to do which is more important than tidying up.Today I finally tidied up so I thought I had better take a picture quick before it gets messed up again! I still have a lot of organising to do of my jewellery making findings and beads etc but at least they are all in one place and tidied up. I will try and do some organising next week.
My work space - tidy for once!!
 If you look very carefully in the middle of the shelves is my new little friend (see him up close below). I have been admiring the cute creations of Quernus Crafts for some time, I couldn't take the cuteness any more and just had to buy myself one! I now have a little mouse to watch over me while I work, needless to say the children totally adore him too! Daisy likes to go and give him a kiss, so sweet (guess what she's going to get for her up coming birthday!)
My new little friend - made by Quernus Crafts 
Please feel free to pass on any tips about organising and keep your work space neat!

Sunday 6 February 2011

Birthday heart

We went out last night to celebrate one of my friends birthdays to an 80's club. I wanted to make her a funky piece of retro jewellery, which was why I started the whole rainbow thing but I couldn't show you this before in case she happened to read my blog.

So I have been meaning to try making hollow lentil beads but for some reason decided I was going to make a hollow heart. Probably not the most sensible idea as I have never tried the technique with the much more simple lentil shape but I like a challenge!

So I sculpted a heart shape from scrap clay to use as a mould.I then made some shells of scrap clay on the mould and joined them together incorporating a wire hanging loop - this is a hollow heart, curved on both sides

I made a sheet of patterned clay by cutting fairly thin slices from my funky rainbow striped jellyroll cane and laying them on a thin sheet of clay, you can just about see where I marked out roughly the size/shape I would need to cover the heart so I didn't waste to much cane.


I used another patterned sheet on the other side so it would be reversible. This photo was taken before I had smoothed the edge joins.


Here's the finished necklace! 


I was going to put it on a long black cord but just tried it on a choker and thought it looked cool so left it. It is rather large! It's 7cm wide by 8cm long! Being hollow it's not too heavy and when I tried it out found it comfortable to wear. I made the mould the size I wanted the heart but then made the shell from a thick sheet of clay and then covered it so it ended up a lot bigger (mental note to self remember a mould needs to be smaller next time!).

Happy Birthday Aly!

Friday 4 February 2011

Choker necklaces and new pendants

Suddenly everywhere I look there are choker necklaces - and they look fab!  I wanted to make some but wasn't sure where to get them in the UK (did have a look on the bead supply websites but didn't find them).

At the London Polymer Clay Group meeting on Sunday, Rebecca Thickbroom  (who is one of the organisers of the Polymer, Pamper, Play event I am very much looking forward to!) showed some beautiful choker necklaces


Rebecca's beautiful choker pendants!


They were inspired by the amazing work of Helen Briel and made using one of her texture stamps

Even the back of Rebecca's pendants are beautiful!

Rebecca was able to tell me where she bought her wire chokers  in the UK and I ordered some.

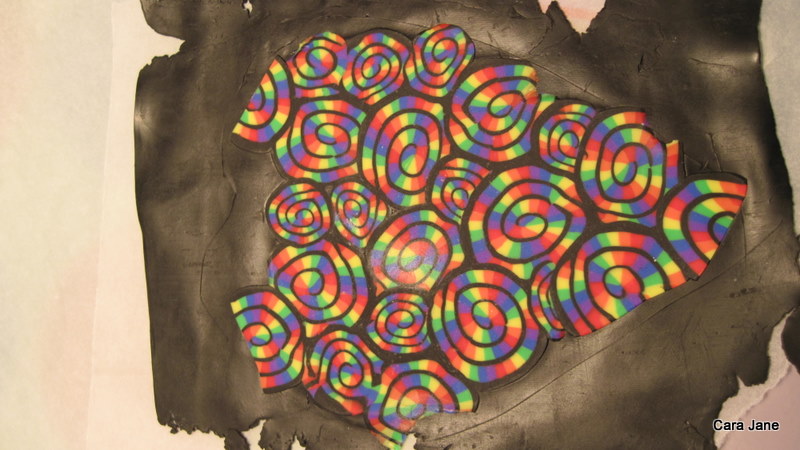
So I was playing with my rainbow stripe jellyroll cane and planning on making a cabochon pendant with it. I decided to make a round one and use a large cane slice in the middle. I carefully firmed the first slice right in the middle and then looked at it and couldn't see how I could tidily cover the rest without any big black gaps or over lapping the middle slice, which I didn't want to do. And as happens with all the best pieces it just made itself.


 I loved the basic concept but was concerned with how I was going to sand it, I only wanted to sand the cane slice and I had smoothed it flush with the black. Also it was bulky - then I had a light bulb moment ;)

This is the first time I have used a light bulb to cure polymer clay in a dome shape, luckily I had put the last one that blew in my clay supplies for just such a moment (as you can see I was getting carried away with my rainbow jellyroll and signature canes)
So here is the end result of the lightweight pendant which drew inspiration from Rebecca's pendants above. I used a very similar textured back which is beautiful, professional looking and best of all doesn't need sanding - genius! Another opportunity to use my signature cane. I just love this, especially strung on the choker wire (so much easier than making up a cord like I normally do!).


I have a small sale in my local church hall (as part of a friends foot pampering night) next week and I shall be making some more along these lines to see if other people like them as much as me!

Phew! Think I am done for now. Thanks for sticking with it.
Cara x

(still not perfect but better photos at least)

Improved photographs - first stage

I am really proud of my latest jewellery and was thinking I must sort out the photographs show I can show you properly. Then today I was emailed some photographs by a friend to use on my blog (post coming soon), they are great photos and I just couldn't put them up against my poorly lit ones so the 'sorting out a photography set up' jumped up the to do list!


See why I need to sort it out...  Here's the rainbow owls photograph from yesterday, I took it on my work bench with my normal room lighting.
Original, just on my work bench, owl photo

Original photo cropped and colour adjusted in Picasa


I wanted to make a light box from a cardboard box (as demonstrated on Kate Tracton's Shibori Girl blog) but typically we don't seem to have any boxes kicking around today. Whilst researching how to set up jewellery photo shoots previous I seem to remember someone using a transparent plastic storage container so thought I would give that a go whilst I find a box.

I switched my usual light bulb to a full spectrum daylight bulb and tried lighting from the top.
Plastic box and daylight bulb lit from the top through the box

I thought it was quite good but my husband who is much more 'precise' than me pointed out that it was still dark at the bottom. So he adjusted the set up and...

Plastic box and daylight bulb light from the front photo - as shot!

Here's what the set up looked like

Better definitely but there is a bit of 'glare'. So my next step is to track down a suitable cardboard box to make a light box and another lamp (with daylight bulb of course) and try lighting from the side. So hopefully you will be enjoying some better photographs from now on.


Thursday 3 February 2011

Rainbow owl

Here's the first thing I have finished (because I don't sand them) with my funky rainbow jellyroll. This little owl has glow in the dark (fimo) eyes and a lovely rainbow tummy and one slightly long wonky ear - it's character of course! I think I might try and photograph my work and checking it before baking, it's amazing what you spot in a photograph that you don't always see in real life. Didn't notice his ear until now.

and have a quick look at his bottom, I am using my signature cane and I like it. I think I will be remaking an improved one with clearer flower sometime soon. 


I shall post some of my jewellery when I have sanded and strung it, hopefully in the next couple of days. I am going to move sorting out my photography set up nearer the top of my to do list so I can show you my work more clearly.

Thanks for stopping by
Cara