Showing posts with label 'Cindy Leitz'. Show all posts

Friday, 9 July 2010

Made a bracelet with the pearl spliced flower beads


Finished bracelet
Originally uploaded by surfingcat clay
So they have been growing on me and now I love this little bracelet! I hope my friend does too.

I started making spliced flower canes when I watched Cindy Leitz's tutorial

Monday, 29 March 2010

Fopals - Cindy Leitz

There has been a buzz of excitement recently on Cindy Leitz's blog about her Faux Opal technique.
 
I tried it the Friday I recieved the video but it didn't really work out at all and I was so disappointed I didn't even take any pictures! The bake and bond was so soft it wouldn't really sand at all.

Finally I found a moment to try again yesterday and baked them for much longer which has made them harder (and thankfully easier to sand) but I am still not happy with the results. I am posting some images here just in case anyone has cracked this technique can share some tips.

Here they are before sanding

 I knew sanding was a key part of making these look good so I spent ages sanding one. Gave it a good long time at 180 and 240 grits and then went through 400, 800, 1000, 1500, 2000 and 2500 grits.


Here it is after sanding.

Not sure what caused the cracking on the bake and bond. My flake colours are still too bright but that isn't a huge issue on these cause you can't really see them.

I have reread some of the tips on Cindy's blog and I think perhaps I have some other ideas to try and also perhaps I ought to go back and sand some more. I will master this technique and hope to produce something closer to Cindy's beautiful sparkly faux opals!


Thursday, 18 March 2010

First polymer clay buttons

Here are my first ever polymer clay buttons! Again it was using a Cindy Leitz video. They aren't great (my fault not Cindy's of course!), I can see lots of room for improvement.

I had problems with the cling film I was using sticking to the clay - must try a different brand. I would of squished them up but I liked the pattern (off cuts from a scrap clay Natasha bead). I think they might be rescued with some heavy sanding - round the edges too where I didn't do a great job with the cutter.

I also must remember that whilst transparent clay looks lovely and white next to colours when raw once baked it becomes more transparent (durr of course) and it's colour is affected by the background. I put these on dark scrap clay to make them thicker and it shows through. They looked prettier before they were baked with the bright white of the translucent. Must use a light background or just use white clay instead of transparent (although in this case it was translucent in the scrap bits so that wasn't a choice)

I think I will use these as the centre of some felt flower brooches. I will post a picture when I have got round to it....

Wednesday, 17 March 2010

Glow in the Dark Rainbow Jellyroll cane

This is a neat cane which I learnt from one of Cindy Leitz's video newsletters  (I love Friday's the day they arrive!). There is a lot of excitement about this Friday's video as it is Faux Opals that look great!

I had to switch back to Fimo as I had Fimo Soft Glow in the Dark and Kato don't make one (might be worth an email suggesting that they do of course). I find the fimo so soft to work with now I don't really enjoy it.

I did for the first time ever put a cane in the freezer for 15 mins before slicing - worked a treat. The cane was nice and firm to work with after that - until it warmed up. Will have to try some of Cindy's cane slicing tips! I do need some help with slicing canes better so if anyone has some tips leave a comment or mail me! I shall make it a mission to experiment and perfect slicing canes.

Glow in the dark rainbow jelly roll cane!


So first things first I made the obligatory cane end tortoises (one from each end of the cane)


I gave these little guys glow in the dark eyes too ;)


I then made a couple of simple cane slice beads and a couple of lentil swirl beads, not sure I swirled them enough now - oh well next batch!

Well these beads have popped into my 'need holes' box as there was no way I was going to make a needle hole in fimo soft lentils - they'd be squished up (althought I suppose I could of employed the freezer again - must try that with some scrap ones). Once they emerge from the need holes box (waiting on my husband to either drill some holes or set me up to do it myself - he's the tools guy) they will make their way to my 'need sanding' box - one day they may emerge as some jewellery....

Monday, 1 March 2010

Tutorials from Parole de pate

Having been off my feet recovering from surgery for quite some time last year and now again  I have probably had more hours than most people to trawl round the internet. There is an amazing amount of information and inspiration for polymer clay artists out there. I am sure you all have your favourite blogs and sources of information (feel free to post a link in the comments to any of your favourites as I may have missed some).

I wanted to share a few blogs that aren't in English with you as it took me a while to come across them and then I was put off initally by the language problem - my French is rather rusty and not that technical anyway. Then I discovered Google Translate! To start with I loaded the web link into the google translate page everytime but then I found the translate button. If you scroll down to the bottom of this linked page you can find a button you can drag to your tool bar for your language. I now have the English one on mine and if I find a site that is in a different language I press the button and it translates it (often rather ammusingly but you can get the gist - cane is translated as duck in French by google )

So check out the French blog   http://paroledepate.canalblog.com/  It is described as a 'living newspaper' of all things polymer clay. There are plenty of tutorials on this site, from artists around the globe.
In the Canes tutos archieve there are 7 pages, yes 7 pages!, of different tutorials of all sorts of canes.Polymer clay addict heaven!
They have even kindly translated some into English and these can be found on the translation__traduction page
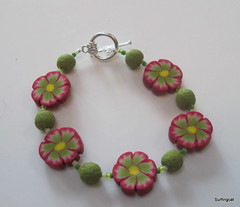
The first tutorial on that page is from Nathalie is to make these beautiful extruder flowers  as seen in some of these beads above. I have very briefly tried this with a few bits of scrap clay but without the Core Adapter as I don't have one, I replaced it with a disc with 7 holes in as shown by  Galina in her Russian Blog (again that google translate came in handy!) Here is my first attempt.
 
Need a bit more contrast next time but they were the colours I had out at the time


Cindy Leitz has a video which shows this technique as part of her members video library - Extruder flowers video information

Sunday, 28 February 2010

Storing clay

In the past I have stored my Fimo Soft in 2 ice cream tubs. One tub with new packets and the other with my open packets. Once I opened a packet I wrapped any left  back in the wrapper  and popped it back in the tub. Any odd scraps went in a 'scrap bag' in the open packets box. I realised that over time sometimes my clay had a few crumbs of a different colour on them which isn't ideal. The bits were just thrown in the box and rumaging aorund for the right colour was what was causing the contamination. Now I am using Kato which is firmer, and more crumbly than the Fimo soft so I will need to be more careful I think, also I am more likely to have blended colours as the range of colours available in Kato is much smaller.

I have decided to try storing  sheets of conditioned clay and mixed colours in punched pockets to see if that helps. I am conditioning a whole 2oz block at once and what I am not using I am sheeting on the largest pasta machine setting and storing in the polythene pocket. I cut down the front sheet  next to the binding so that it opened to get the clay in and out. I saw this system in a video tutorial posted by Alice Stroppel on her blog http://polymerclayetc.com/ . I'll let you know how it works out.

I have also started storing my scrap clay in different colour bags rather than all in one big bag. My old scrap bag has lots of lovely colours but all mixed up and some of the nicer colours are covered in horrible clashing crumbs. I also now have a cane offcuts bag for those small but pretty bits of scrap, thinking Natasha beads here. I think I may try and get some divided boxes so I can just leave it open on the table and throw the scrap in the right colour segment rather than having to find the right bag. Again I'll let you know how it works out and please do share your ways of storing with me. Someone must have a great system already!

I know not all plastics are safe with polymer clay but Kato web site states  Polypropylene which is marked as recycling symbol 5 is safe with their clay. I have emailed Staedtler about Fimo as I can't find any advice on their website. There is a lot of information on Cindy Leitz's blog about storing clay and she says things marked with a 1 or a 5 are safe for clay. Generally hard crystal clear plastic should be avoided - I have ruined some good canes in these type of boxes :(

If you have any top tips for storing your clay please let me know.

Next to think about how I store my canes cause a have tried a few ways and no of them have really worked...