Thursday 26 May 2011

Special pen

It's my husband Richy's 40th birthday today. Hopefully he is having fun at work while I bake his cake and prepare a special meal for dinner!

He got lots of presents from me and the children but here's one I wanted to share with you.

 Rhodium plated pen with polymer clay decoration
The pen looking all fancy in it's presentation box

You may remember I made a pen for my mum recently, from a fairly average pen kit and I was really chuffed at how great it looked compared to covering a biro. Well this was a fancy pen kit, rhodium plated no less. It cost more than I would normally dream of spending on a pen but it was for my wonderful husbands 40th birthday. It looks great it has a real air of quality about it and the parts went together much more easily! I particularly like that the barrel is in one part so only 1 part to cover and there's no band in the middle so you could shape the barrel if you wanted (although straight is easy!). With the 2 barrel pens if you don't get the thickness just right it can look a bit odd. I ordered a few more of the cheaper pen kits when I ordered this but I think I shall spend a little more and get a better quality kit to work with in future, they do plain chrome ones the same as this which are much more reasonably priced.

Right back to my baking.....

Monday 23 May 2011

Beaux Bangles with Carol Blackburn

I was lucky enough to attend a workshop with the lovely Carol Blackburn yesterday. The workshop was organised by Clectic Events (Rebecca Thickbroom) so I knew it would be well organised, and indeed it was! It was great to spend time with so many lovely people. To catch up with some people I now consider old friends and to meet some new friends too! And even better I get to see a lot of them again this Sunday at the London Polymer Clay Group Meeting .

I haven't got long to write this post as I am preparing for my husbands 40th birthday on Thursday (i.e. making all the stuff I meant to make for him weeks ago but...) so I shall show you what I made (quickly snapped photos too - sorry).

I made 2 bangles in the workshop, although I had to finish bits of both of them at home today.

The first bangle I made I used Fimo, as the workshop was being sponsored by them and we had been given some blocks. I used to work with Fimo soft until they reformulated it and it became too soft for my liking, then I swapped to Kato and have never looked back. I have sanded it  but it doesn't feel as nice as the Kato and I found it too sticky and squishy when I was working with it. It does smell better though! I really like one part of the bangle - this bit here

it's a neat looking pattern and I like the spread of colours. And I really don't like this bit

it looks kind of smeared and messy and the colours don't work. The structure of it is good and sturdy and I like the technique Carol showed us.


The stripy one  is a lot more chunky than the first one and has a core of sculpey ultralight (thanks Toni for providing it!) so it isn't much heavier. It was the first time I have worked with sculpey ultra light, and possibly the last, it's like marshmallow! The rest of the bangle is made with Kato clay. It needed more sanding at the middle stage really but I rushed it as I wanted to get it covered in the class so the outer profile is a little lumpy and bumpy and not the best shape. It's quite a striking piece of jewellery though and you don't see the lumps and bumps.

I've done some more baking experiments (which I will report when I have a moment) so I hope with my new knowledge from Carol's workshop and my experiments I can make strong skinny bangles too. Can't wait to try out some more big bangles but it will have to wait, birthdays and then school holidays - hmm perhaps my children would like to make some too! My 6 year old son loves to make jewellery for his girlfriends, will have to find a child size bangle form!

The Ripple Effect is another Carol Blackburn/Celctic Events workshop happening in London on the 21st August. I can't make that one unfortunately but I've seen the sample pieces and they look great!

Sunday 15 May 2011

Baking experiments part 1

In order to find out how best to make strong bracelets I have a series of experiments planned. The first thing I wanted to find out was if polymer clay is stronger if it's quenched, that is plunged into ice cold water straight from the oven. I've heard people say this makes it stronger, polish better and it will keep transparents more transparent. Well I'm using grey coloured scrap Kato clay so can't comment on the transparency but my findings were that it doesn't make clay stronger or polish better.

I wanted to know how strong polymer clay was when it was being bent so my clever engineer husband set up a test for me. I used to do similar work with composite materials for a living as a research materials scientist but I had big expensive machines and gauges to record what was happening (I've got a photo somewhere I will try and dig it out). My husband has also done similar work (we met at work) but is better at finding alternative ways to do things than I am, he's a real problem solver!


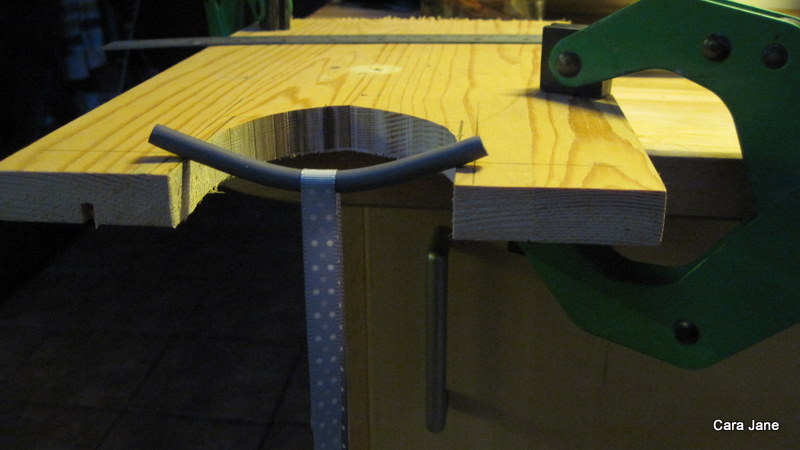
Here is one of my extruded rod samples, of extremely well conditioned Kato scrap clay. They are 10cm long and about 6mm in diameter. I chose to extrude them so I could be sure they were as similar as possible.


The sample is 'bridged'  over a gap. A loop of ribbon is passed over it and attached to an empty milk carton. Water is poured into the carton until the samples breaks and then we weighed how much water the sample had 'held'. My husband tried to poor the water into the bottle at a steady rate, he isn't holding the bottle just has his hand under it to catch it when the sample breaks so the water doesn't spill. We weighed the water in the bottle at the point that each sample broke.

One of the test pieces not long before it broke! As you can see it has bent quite a bit.

All the test pieces were baked at 150°C (verified with oven thermometer) for 10 min. At this point
three samples were taken out of the oven and left on the side to cool, I am calling these samples 'room temperature'. Three were plunged into ice water, I am calling these samples 'quenched' and three were left to cool in the oven which was turned off  and cooling down slowing, these are called 'slow cool' samples.

The results
'Quenched' samples breaking point weight - 485g, 673g, 772g
'Room temperature' breaking point weight -501g, 481g, 759g
'Slow cool' samples breaking point weight- 1069g, 1274g, 1522g

As you can see although there is a fair bit of variation in the results without a doubt the 'slow cool' samples were significantly stronger in flexure (being bent). Watching the test they obviously bent a lot more than the other 2 types of samples before snapping. I'll try and video one of the next ones so you can see a test in action.

I then polished one part of each type of sample using my micromesh  cloths and counting the strokes, doing the same for each. The verdict on that is that there is no discernible difference in shine between them.

This test was with Kato clay, I am curious if it's true for other polymer clays but being as I don't use other brands I probably won't take the time to find out I'm afraid.

I am going to do two more tests one to see how the baking temperature effects the strength in flexure (bending) and shine and one to see how the baking time effects the strength in flexure and shine. I am pretty sure that the longer baking time will make them more shiny when polished as that is one of the reasons I currently bake for longer, it will be interesting to find out in a more controlled way though.

The results may be a while coming so in the meantime I would advise that if you want your clay strong, leave  it to cool down in the oven after turning it off when you have finished baking!

Friday 13 May 2011

Blogger down - lost post - bangle problems

I guess many of you bloggers know that blogger has been down for a while (since last night for me in the UK). It made me realise that I have no other record of the information in my blog as I wanted to check back on my - things I want to make post to remind me and couldn't access it. Can you back up blogs? Must investigate.

Also I wrote a long wordy post on bangle problems - blogger has probably chosen not to publish it cause it was too long and boring! I will try and summarise it this time round.

I have trouble making solid polymer clay bangles, the often seem to break easily. At first they seemed to break at the join so I now add a bit of polypaste and make sure I smooth the seams carefully. That solved the popping at the seams but now means they break elsewhere instead! See evidence below

 These were made from very well conditioned Kato scrap clay extruded through the largest makins D shape die (about 8mm wide and about 5mm at it's thickest). Joined carefully with some polypaste, baked on an empty coke can at 150 oC (300F) for 40 mins. They broke when I was carefully sliding them from the coke can, the first break was not at the join. Glad they broke then rather than after I had taken the time to cover them  I suppose!


This bangle is made from a sausage of well conditioned Kato clay joined carefully with some polypaste in the join, covered with a decorated sheet of cane slices, baked on an empty coke can at 150oC for 1 hour. It looked fine and felt strong so I wore it for a morning. All good until I decided to sand it. Almost the minute I started gently sanding with my soft micromesh cloth draped over my fingers it broke. It is quite skinny, about 8mm in diameter, like some others I have been wearing which are fine - here's a post about them.

So where am I going wrong with them? My husband has a feeling that baking them for a long time they are strong but brittle and I should under cure them rather than cure them for longer so they are more ductile, less brittle. I was about to start some baking trials for different times when I came across a post from Tony Aquino on the Kato Polyclay Facebook page stating that the higher the cure temperature the stronger the clay will be. I will try and test some different temperatures too. What I need for bangles is something with a little flex I guess. I've had a few suggestions from clever people at the PCC Forum to try out. I will report back with anything I find out, but please leave a comment or mail me if you have any ideas I could try to make bangles that don't break!

thanks

Cara

Thursday 12 May 2011

Bangle problems

I struggle with bangles. I love them and want to make them but don't trust them not to break. I have bought several tutorials on making bangles in the hope they would give me confidence to make bangles I could trust but still the only ones I have faith in are the 2 part 'Bam bam' bangles that I learnt from Tina Holdens tutorial (which I'd highly recommend). My favourite bangle I wear all the time is made like this and seems very sturdy.


I have tried several other methods of making bangles and find that they break very easily, sometimes when removing from the bangle form (I use a coke can, a glass or a large round cookie cutter), sometimes whilst sanding and some seem ok but due to the number that have broken I always wonder.

The blue and white set I made for myself and have been wearing seem to be OK. I made those by rolling a long sausage of clay and joining the ends with polypaste. In the past it was often the joins which popped open so I thought the addition of polypaste would help to strengthen that weak area. I was also concerned that perhaps the clay wasn't conditioned enough so the clay for these were very well conditioned to make sure this wasn't an issue. I also baked them extra long to try and make them as strong as possible.

With the success of these bangles I made another one the same way. A long thin sausage of well conditioned clay, covered with cane slices, joined with some polypaste and the clay well smoothed over, some cane slices on top of join. I baked it extra long. I loved it and put it on straight away. I wore it all morning and it seemed fine. I then went to sand it and within about 5 seconds it broke. Devastating! I was being careful, I wasn't being rough.


This wouldn't be so bad but I have an oustanding, or perhaps I should say over due, order for a smaller bangle like one I had made at Polymer Play Days last year. We were given prebaked bangles to cover which had been formed from extruded D shapes. I tried this last night. I made sure my clay was thoroughly conditioned. I extruded using the largest D shape in the standard makins extruder die set, put them round an empty coke can, joined the ends with polypaste, baked extra long (50 mins) ..... and they broke when I tried to take them off the can. Arghh!!

The first break in both cases was not at the seem so I am sure the polypaste at the join helps.

Maybe they just need to be more chunky. I am off on Carol Blackburn's Beaux Bangle course next weekend (so exciting, can't wait! I get to see my 2 lovely school friends for a couple of nights first too!) so I am sure I will be able to make beautiful big bangles after that but I want to be able to make little ones that don't break too. I shall see what I can find out -I shall do some experimenting and I have asked for advice on the Polymer Clay Central forum too. If you've got some advice I'd love to hear it!

Thanks
Cara

Monday 9 May 2011

Purple Flowers,pendants, micromesh and pens

My mum got more birthday presents made by me. I wasn't quite sure how my disc necklace would work out so I went back to something I knew would work just in case - a flowery cabochon. Again in purples. It turned out very well, I'm very pleased with it. She ended up with both.


I recently bought some new micromesh sheets in the 8000 and 12000 grits. Previously I had the basic hobby kit which went up to 6000. The difference in the shine is marked. Polishing up to 12000 grit micromesh means that you can buff to a glass like shine by hand on a tea towel! Add a little mechanical buffing on the dremel and they are glorious! With this one I made the cabochon (hand formed) then I baked and polished it then added the frame and rebaked.  I polished again through the last 3 grades briefly and then buffed. It certainly doesn't look like polymer clay any more!

I also made my first proper pen, with a pen kit rather than covering a cheap biro. Again for my mum, she was a little spoilt I think, but she deserves it!
In theory it's refillable but I had some trouble fitting the parts together so I am not sure how easily it will come apart to put refill in. Again it's polished with the new finer micromesh cloths and it's a thing of purple beauty! I wish I had made my polymer clay bits a tiny bit thinner so it doesn't bulge out from the central band. Next time I will - or I'll just cover the band with a different clay pattern too! I've ordered some more pen kits so watch this space for more. I have ordered some different types to try out. There are so many different ones out there it's hard to know which ones to buy.

I've made some other jewellery bits with the same 2 purple flower canes. As always I didn't make the canes big enough, if I didn't like them I would have lots of it of course! Sometimes canes just really turn out great. With these I love how the colours work together but because I wasn't sure if using all purples would be too much I only made very small canes. Luckily I am getting good at cutting thin so I have made them go a long way.

Sunday 8 May 2011

Purple discs

You can see my post about my purple disc necklace and this bracelet over on my new blog -I'd love to see you there -this link will take you straight to the post http://www.carajane.co.uk/2011/05/purple-discs.html

This blog is no longer updated - there is plenty of new stuff over at www.carajane.co.uk


Monday 2 May 2011

Cindy Leitz's Teardrop Blend Shift Video free to view this week

For those of you who haven't seen it mentioned elsewhere Cindy Leitz is offering free access to her recent Teardrop blend shift video it's for a limited time, she said a week in her first post. So go check it out now while you can!

Sorry I haven't had much to say recently, April seems to have been a month long holiday this year! I've had an excellent time out and about and hardly touched my polymer clay. That's all set to change in May as I am looking forward to attending 2 events. Carol's Bangle class that I mentioned in the last post and the London Polymer Clay Groups 4th birthday meeting. I look forward to reporting back.

There aren't many photos of me from my recent holidays cause it's normally me behind the camera but here's when I met the Mad Hatter (cause the children were frightened of him for some reason so were hiding under the table) at a character breakfast at Disney World