Showing posts with label extruder. Show all posts

Friday, 26 March 2010

Sandy's Extruder Experiments

Thank you to Sandy for taking my extruder experimentation a step further and sharing it on her blog.
She had the great idea to extrude the square logs in the first place (why didn't I think of that lol). She has developed the technique one step further, twisting the logs to make these cool spirals

 You can find out what she did on her blog here
http://blog.simple-inspirations.com/2010/03/extruded-spirals-week-12-of-canes.html

I have played around a bit more with this square logs instead of discs technique but haven't come up with anything worth reporting.  Next time you have your extruder out try something whacky and let us know how it turns out!

Tuesday, 16 March 2010

Playing with the extruder - square sticks

I have been playing a lot with  polymer clay recently, trying out new things.
I thought I would share some of them with you, here's the first...

Square sticks

I didn't quite take the right pictures so you will have to piece it together a bit yourself.

I put some sticks of polymer clay in the extruder barrel instead of the usual discs to see what would happen. As you can see I was just playing around and not taking my time to be neat. I would cut them into neater square cross section sticks of even size in future. On the right are 2 bits of the extrusion you get with a triangle pattern.

Here is a shot I took for my reference. I used square sticks in the barrel and the square extruder die and I got out the square diamond patterns. Here you can see what they looked like put together. There are 16 of the extrusions in that pattern piece. I put 4 together to make a larger square and reduce it, then cut and restacked into the slice shown.


I guess if you rotated the square extruder die in relation to the square sticks you would get a quarters pattern.

(just playing about with the e-pen I am trying out hence the sketch - I drew it on paper with the e-pen which also captures it as a jpeg)


You could of course just cut square or triangular  pieces of polymer clay and put them together to make this but it might just start you of on an experimentation with the extruder of your own.

Wednesday, 10 March 2010

Kato extruder beads

I just realised that although there is a fair amount of talk on flickr and in the comments about these brown Kato Extruder beads I haven't actually posted a picture of them here. I know you have seen the necklace which uses a disc pendant and some smaller beads using this technique but here are the beads I made first. I am writing the tutorial as we speak! It'll be here soon.

Actually made some jewellery!

Last night I delved into my big box of polymer clay things and liberated some to become jewellery. Here they are.


Here are some of those Kato extruder technique beads (the tutorial is being written!)
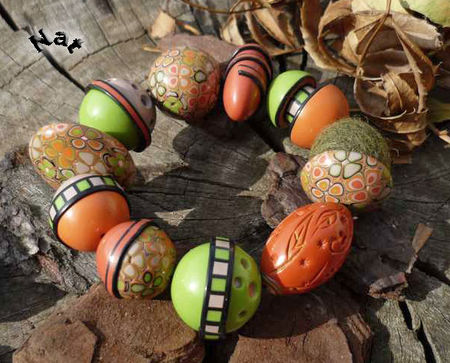
I am really pleased with how this turned out. Although normally I really don't like brown or orange, somehow I love the colours on this. I wouldn't wear it as it wouldn't go with my normal colours so I will have to make the same but in different colours I guess. Probably turquoise and green.


Here is a purple creation made from a few bits of scrap and a couple of purple sparkles. It's a little on the random side but I quite like it. This is that same Kato extruder technique with purple, magenta and white.


Here I am wearing a necklace made from the Kato spliced flower cane I made as part of my brand comparison trial. I only made a small cane and I just about managed to squeeze 3 slices from it. 


Close up of splice flower cane beads


I spent this morning making a bracelet from a kit I was given for Christmas 2 years ago!It is jangling as I type, and definitely not recommended for wearing whilst working with clay lol.

Blue glass beaded charm bracelet

I would like to say a huge thank you to my wonderful mum who has not only given up the last 3 weeks to look after our family (whilst I am on crutches after having an operation on my foot) taking the kids to school, shopiing, cooking, cleaning, washing etc. but has got out all my clay things for me everyday, and tidied them up! She bought the bits I needed to complete the brown necklace at the weekend and has been a great artistic sounding board!

It feels really good to actually make somethings rather than leave all my beads and bits in a box waiting to be brought to life. I hope to liberate some more soon (another sanding session in order...)


Monday, 1 March 2010

Tutorials from Parole de pate

Having been off my feet recovering from surgery for quite some time last year and now again  I have probably had more hours than most people to trawl round the internet. There is an amazing amount of information and inspiration for polymer clay artists out there. I am sure you all have your favourite blogs and sources of information (feel free to post a link in the comments to any of your favourites as I may have missed some).

I wanted to share a few blogs that aren't in English with you as it took me a while to come across them and then I was put off initally by the language problem - my French is rather rusty and not that technical anyway. Then I discovered Google Translate! To start with I loaded the web link into the google translate page everytime but then I found the translate button. If you scroll down to the bottom of this linked page you can find a button you can drag to your tool bar for your language. I now have the English one on mine and if I find a site that is in a different language I press the button and it translates it (often rather ammusingly but you can get the gist - cane is translated as duck in French by google )

So check out the French blog   http://paroledepate.canalblog.com/  It is described as a 'living newspaper' of all things polymer clay. There are plenty of tutorials on this site, from artists around the globe.
In the Canes tutos archieve there are 7 pages, yes 7 pages!, of different tutorials of all sorts of canes.Polymer clay addict heaven!
They have even kindly translated some into English and these can be found on the translation__traduction page
The first tutorial on that page is from Nathalie is to make these beautiful extruder flowers  as seen in some of these beads above. I have very briefly tried this with a few bits of scrap clay but without the Core Adapter as I don't have one, I replaced it with a disc with 7 holes in as shown by  Galina in her Russian Blog (again that google translate came in handy!) Here is my first attempt.
 
Need a bit more contrast next time but they were the colours I had out at the time


Cindy Leitz has a video which shows this technique as part of her members video library - Extruder flowers video information