Wednesday, 31 March 2010

Pivot Tile from Color Inspirations and improved confidence.


I finally got round to making a pivot tile from Polymer Clay Color Inspirations. I had a real mental block on this for some reason. I didn't have any orange clay when I got to that section and then I kept on putting it off.

I quite enjoyed it and was quite surprised how much the colour changed with such small additions. I think it will be a useful tool for colour mixing so I shall make some more with the other Kato block colours.

I can see I have quite a lot of air bubbles in the clay. They are such tiny amounts of clay I did a bit of squishing through the pasta machine instead of folding and putting the fold first. I guess that's where they came from.


Polymer Clay Color Inspirations: Techniques and Jewelry Projects for Creating Successful Palettes
I spent an evening introducing some friends to polymer clay the other night and I was quite surprised by how confident I felt in guiding their colour choices. Although I haven't worked my way through the book yet I can tell it has definitely improved my confidence with colour already. Particularly for caning, where I sometimes got disappointing results due to poor colour choices. So I would highly recommend it to anyone else who either isn't sure about colour or who just doesn't think about it currently (how I used to be)

Monday, 29 March 2010

Fopals - Cindy Leitz

There has been a buzz of excitement recently on Cindy Leitz's blog about her Faux Opal technique.
 
I tried it the Friday I recieved the video but it didn't really work out at all and I was so disappointed I didn't even take any pictures! The bake and bond was so soft it wouldn't really sand at all.

Finally I found a moment to try again yesterday and baked them for much longer which has made them harder (and thankfully easier to sand) but I am still not happy with the results. I am posting some images here just in case anyone has cracked this technique can share some tips.

Here they are before sanding

 I knew sanding was a key part of making these look good so I spent ages sanding one. Gave it a good long time at 180 and 240 grits and then went through 400, 800, 1000, 1500, 2000 and 2500 grits.


Here it is after sanding.

Not sure what caused the cracking on the bake and bond. My flake colours are still too bright but that isn't a huge issue on these cause you can't really see them.

I have reread some of the tips on Cindy's blog and I think perhaps I have some other ideas to try and also perhaps I ought to go back and sand some more. I will master this technique and hope to produce something closer to Cindy's beautiful sparkly faux opals!


Blogger picture problem and Pledge Finish

I was struggling trying to load some pictures into my post when I realised that the pictures of mine have disappeared from my blog and other people's blogger blogs. I guess there is a server problem somewhere.
I shall give up with that post til later.

I tried the Pledge Multisurface Wax (the UK version of Future I believe) today. I painted it onto an unsanded tortoise - no problem but it does emphasise the finger prints (it was a premo one wouldn't have had finger prints on a Kato one). I tried painting it onto a flat pendant but it wouldn't cover the surface. I would paint it on but it would creep away from some areas. I tried spreading it out again and again but it kept doing the same. I tried it on a freshly sanded button which was well sanded and buffed and it did the same. The polish made a sort of donut shape coming away from the edges and the centre of the button. Anyone got any ideas?

It says on my bottle it should be dry after 20 mins and nothing about recoating. It also says something about being self sensitive so it won't build up - does that mean I won't be able to put more coats on? I gather from what I have read that Future says it can be recoated after 8 hours. I will leave them over night but so far I am not impressed.

Sunday, 28 March 2010

Blogger in draft

 I came across Blogger in Draft thanks to a tip of from Doreen's Backyard Beads Blog. It is an easy way to change your blog and I know several people have revamped their blogs using it and they look great. I haven't really played around with my blog design yet but it has a host of other features that are much better than the standard Blogger. For example there is a spell check on the Compose toolbar and also an add video button.

When you add pictures you have many more options. You can upload from your picasa web albums, your computer and it also shows all the photos already used in your blog. You can a caption and edit the link to the picture.
Paisley Pendant
To use this you just log into http://draft.blogger.com/ and then tick the option at the top right to make Blogger in Draft your default dashboard.

Fimo vessel

Here is a little fimo vessel I made about 15 years ago! It is made entirely from Fimo. I found it when I was tidying up my craft supplies - wow there's a lot of stuff I had forgotten about! I made a series of them with different colours and some with fancy flower petal tops but gave all away except this one.

Fimo Vessel

Saturday, 27 March 2010

Avoid contaminating your clay in the pasta machine with other colours of clay.

I am sure some of you know this already but I only just worked it out so I thought I would share it in case some of you don't know either.

I clean my pasta machine with a baby wipe between colours of clay. I wipe  the underside of the rollers (underneath the machine) where the crumbles sometimes collect and I wipe the top whilst turning the handle to make sure the rollers are clean. Sometimes though I still get annoying streaks of colour across my clay and I couldn't work out where they were coming from. I decided it was time to clean my pasta machine. My husband took it apart and cleaned it for me. Great!

Not  long after that a purple streak appeared on my white clay! Horror it had only just been taken apart and thoroughly cleaned! I played around trying to work out where the clay could possibly be coming from. I turned the handle to rotate the rollers backwards and there was my answer!
Pasta machine with stray purple clay on the rollers

I checked it out and if you turn the rollers backwards you get little stray bits of clay pretty much everytime. I am guessing my contamination comes when I inadvertantly rotate the rollers the wrong way a little. I guess it comes from the scrape plates at the bottom (where the crumbles collect on the outside).

Now I have incorporated rolling the rollers backwards as part of my cleaning routine and I haven't had any contamination issues since.

Friday, 26 March 2010

Sandy's Extruder Experiments

Thank you to Sandy for taking my extruder experimentation a step further and sharing it on her blog.
She had the great idea to extrude the square logs in the first place (why didn't I think of that lol). She has developed the technique one step further, twisting the logs to make these cool spirals

 You can find out what she did on her blog here
http://blog.simple-inspirations.com/2010/03/extruded-spirals-week-12-of-canes.html

I have played around a bit more with this square logs instead of discs technique but haven't come up with anything worth reporting.  Next time you have your extruder out try something whacky and let us know how it turns out!

Thursday, 25 March 2010

Got some at last!

I actaully went out to the shops today (my dad took me as I am still not driving) and I managed to get my own bottle of Pledge Multi-Surface Wax which is the UK version of what was Future! Unfortunately got a busy few days so might have to wait to try it.

Wednesday, 24 March 2010

Sanding experiment

So I have been reading up on sanding and everyone agrees on wet sanding with wet and dry sand paper and also making your item as smooth as possible before baking to reducing the sanding needed. But  I still couldn't really figure out how long I should be sanding on each grade or how many or which grades of sandpaper I should use. I do know that I have had a few pieces that still had scratches on after sanding so I needed to do it better somehow.

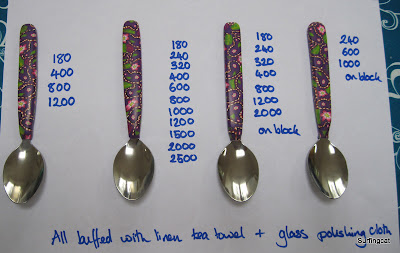
Today I sat down with some paisley spoons and my usual sanding set up (a narrow tray with some warm water and a few drops of washing up liquid in it to help break the surface tension) and 11 different grades of wet and dry sandpaper! For flat objects I put the paper on the tray under the water and sand on the flat surface. For things that aren't flat (such as spoons) I sand above the tray and dip the paper and object in the water when I start to notice a residue. Thinking about it a bowl would be easier when not sanding flat things so will try that next time.
Sandpaper wrapped round a block

I normally just use the sand paper in my hand but today I also tried wrapping it round a block (one of the kids wooden building blocks). It made it more comfortable to hold at least so I will do this again.  I should of sanded using the same grades of paper with and without the block to see if that made a difference - next time! Quite a few people recommend using foam backed wet and dry sandpaper. I don't have any but I also just read a tip about wrapping normal sandpaper round foam for curved objects - going to give that a try too.

I had 4 spoons so tried using 4 different combinations of papers - all finishing on a different grade.


The first thing that struck me was how similar they all were! I thought you would easily be able to tell the difference between the ones that had been finished to a higher grade, but it was hard to tell. My mum even thought that the one on the left, the one finished to 1200 grit sandpaper was a little more shiny. My dad was able to correctly identify the one that had been sanded most (the second on the left that had been sanded through to 2500 grit). After a lot of sitting and feeling them I can now tell the difference too but it doesn't show visably.

How to tell when to move to the next grade of paper? I have found that for me (at this stage in my experience of sanding) I need to dry the piece to be able to tell. If I just go through the grades wet I get to the end and there may still be some scratches. If I stop and dry between grades I can see if it is ready, I can see if there are still marks or not.

So I still have things to try but I am going to stop agonising over which grades to use. I shall try and finish off with some of the higher grades if I am using a buffed finish. I'll let you know how my next lot of trials go.

Tuesday, 23 March 2010

Lentil Swirl Bead Tip for Patterns

Well if you have made a lot of lentil swirl beads you will already know this but in case you haven't here's something I learnt about patterns today (I don't normally swirl with patterns usually it is just a pile of scrap).

I carefully placed a flower in the centre of the ball I started swirling thinking it would look nice swirled - but it disappeared!
Swirl lentil bead that started with a flower in the centre that 'disappeared' 

Desiree does say in her excellent tutorial on making lentil swirl beads that the rotation does draw the clay from the outer areas towards the centre of the bead. With pattern this means that the pattern at the edges expands and the pattern in the centre shrinks to the point of almost disappearing at the very top of the bicone. So when choosing where to place your round ball to start swirling put the pretty bit off centre! If it is in the middle it is likely to shrink very tiny the outer edge gets huge and somewhat distorted so the best place for that pretty flower is somewhere between the two.


Swirl lentil with flowers placed between centre and edge

This was using up my offcuts from some Paisley spoons I made for presents today (oh and one for me too ;).
I have refined my technique and can now make the fabric up (from the preprepared canes - I still have plenty!) and cover 6 spoons in about an hour. I have a feeling I will be making plenty more so that's good news.

Pink from La Fille du Consul


la vie en rose
Originally uploaded by delphineR2M
I have just come across the work of Delphine- thanks to Polymer Clay Daily featuring her work.

I love these flowers they are so delicate looking. She has a giveaway on her blog and one of the entry conditions is to post something pink on your blog. What better than her own pink flowers!

I thought that I didn't really use pink but actually I do have my pink flowers from the paisley cane

My pink flower.

Purple plastic flower brooches

I started making these brooches back in July 2009 but they have been sat waiting to be finished since then.
They are made from shrink plastic and then painted with acrylic paint. They are about 6cm in diameter.
Finally they are finished!

Shrink plastic and acrylic paint brooches

Monday, 22 March 2010

Silver flower prototype

A while ago I saw instructions to make a  necklace in a jewellery magazine that I loved. I thought wow I am going to make one of those. I set of to the computer to buy the beads listed and realised that the price of the components was over £60! Now I have never spent that much on a piece of jewellery before and didn't intend to start spending that now either. I realised that the most expensive part was the silver flower focal bead because it was Thai Hilltribe Silver and cost £35, so over half the cost.

This was the thing that made me finally get round to buying the tools for Polymer Metal Clay that I had been thinking about for a while. I shall make one myself! (I always say that and how often does it ever get finished?). I have used PMC before in a workshop and I bought myself a book too so I should be OK. Needless to say I haven't quite got round to trying it yet but I have made a silver fimo prototype. I wanted to check out how I was going to construct it before I started playing with the expensive, and quick to dry out silver clay.

Here is my fimo version.
Well now it's out here in blogland perhaps I will get round to trying it....

Sunday, 21 March 2010

What shall I do with those lentil beads?


copperpinkswirl3
Originally uploaded by purplecactusstudios
I have made several lentil beads in the past but they all sit in my big box of polymer clay things yet to be given a lease of life. The new improved me who actually makes things needs to get using them so what shall I do with them?


I found loads of lentil bead jewellery on flickr (that link will take you to my lentil bead gallery, wish you could have more than 18 images in a gallery I could have had lots more!).


I think I will look at making them into a necklace with some other beads inspired by these amazing necklaces by purplecactus studios. I really love their work it is so bright and interesting. I have plenty of purplecactus studios jewellery in my flickr favourites.

See more of Purple Cactus Studio's jewellery and other art at their website http://www.purplecactusstudios.com/

I hope to be able to share some of the birthday presents I am making soon (when I have made them lol!)

Saturday, 20 March 2010

Perles givrées - Frosted beads

I have to say I  often see polymer clay things that are breathtakingly beautiful. There are so many talented people out there! I have an ever growing collection of favourites on flickr.


I came across this from Gris Bleu today and I just had to share it.

Quick clay play today - scrap lentil beads

It's the weekend and the kids are around so it is time for family but my kind husband took the kids down to the gym this morning which meant I had just over an hour of clay time alone. I spent my time playing with the extruder but didn't produce anything I would bother repeating. So what do I do with this pile of scrap I have just produced? What else but swirl lentil beads. They haven't been baked yet but here they are.

 Scrap clay lentil swirl beads

My aim is to try and turn them into some jewellery realatively soon (but I do have a lot of birthdays coming up, 5 next week including my daughter, my Godson and 2 close friends!).

Friday, 19 March 2010

Buffing with the Dremel - part 1

Having sanded and buffed a load of beads by hand last week I decided to try buffing with a dremel. I wanted to get a really shiny buffed finish and I had read that you could only achieve this with mechanical buffing. I only started sanding recently and have  been buffing by hand  on a tea towel . I have never used a dremel before, I am borrowing one from my parents.


I tried the dremel buffing wheel (sewn muslin one that comes with the Dremel) last week and managed to make some nasty grooves in my work. The surface was horribly dull and the grooves took a lot of sanding to remove. I then went and read up about buffing with a dremel. I found some good information at
http://desiredcreations.com/  and http://www.glassattic.com/. Seems that the stitching on the dremel buffing wheel makes it too harsh for polymer clay so something softer was required.

So today my Dad (it's his turn to look after us this week, giving my mum a well earned rest)  and I sat down to try out buffing with the dremel again. I made a new buffing wheel from some polyester fleece fabric I happened to have in my sewing box. I cut some circles, about 7 cm in diameter and fitted them to the mandrel that you screw the regular dremel buffing wheel onto. I used 5 layers of fleece cause I couldn't screw the mandrel together with more and didn't stitch them together at all.

Fleece circles being threaded onto the screw for the Dremel mandrel

I tried it on one of the sides of the large bead I ruined previously and eventually it came up pretty shiny. It took quite a long time and it still wasn't as shiney as I hoped. It wasn't the miracle I was after ;) I think perhaps it would be easier if I had a stand for the Dremel as I am having to hold clay in one hand and Dremel in the other.  I might have another go at making a buffing wheel stitching them together - look what this one looked like after just a little use.


I am currently sanding using 240, 400, 600 and 1000 grits (what I had available). I have just ordered a set of sandpaper with 10 different grits from 180 to 2500 grit!  I don't imagine I would ever have the patience to use them all, or that it would be necessary but I will experiment a bit to see if I can start of with a smoother finish to buff. I am also off to investigate the best place to buy a rock tumbler from for my round beads - they are so hard to sand by hand!

My dad was convinved that waxing was the answer to sheen and applied the last dregs of our furniture wax and then some natural (clear) shoe polish to some of my beads (which he kindly sanded first - taking the skin of one of his fingers- ouch!). He applied the wax and then buffed it on a piece of fleece stretched over some wood (held in place with some staples). Then he continued buffing on the otherside of the wood with some clean fleece, the other side was now waxy fleece. It did come up looking pretty good but it was quite hard to tell (in my opinion, dad could see one) the difference between the with or without wax beads buffed on fleece.

Previously I had found a linen tea towel the thing that got me the best shine when buffing (from the limited selection of things I tried). Today I tried a buffing on linen and buffing on fleece to compare and the bead buffed on fleece was definitely more shiney. I have now cut a piece of fleece for my clay box.

So more experimenting is needed. I need to perfect (well improve would be a start) sanding, find a better way to mechanically buff to a high shine and  I want to try out some varnishes. I have only used the Fimo Gloss varnish on polymer clay and I am not that impressed with it. I would like to have a range of finishes at my disposal so I can choose how I want a piece to look. 

If you have any advice on buffing/sanding/polishing then please let me know it might help this part of my journey go a little smoother. 

Thank you for following me on this adventure with clay.

Cara

I've finished and used the buttons (well 1 of them ;)

Anyone who knows me will recognise the power of the blog - I am not one to finish things as a rule. So this week I not only made some buttons but I finished them (sanded and buffed - they came up pretty good) and then made a brooch using one. Here it is

 Felt flower brooch with polymer clay button

I am thinking about making a blog about the rest of my life as this one seems to be a very good motivator (I don't want to bore you all with the state of my house or why I can't get out of bed in the morning...)

My daughter who will be 4 next week is sat on one leg whilst I write this. She just said, "I want to make one of those!" So off to get the felt out again!

Thursday, 18 March 2010

First polymer clay buttons

Here are my first ever polymer clay buttons! Again it was using a Cindy Leitz video. They aren't great (my fault not Cindy's of course!), I can see lots of room for improvement.

I had problems with the cling film I was using sticking to the clay - must try a different brand. I would of squished them up but I liked the pattern (off cuts from a scrap clay Natasha bead). I think they might be rescued with some heavy sanding - round the edges too where I didn't do a great job with the cutter.

I also must remember that whilst transparent clay looks lovely and white next to colours when raw once baked it becomes more transparent (durr of course) and it's colour is affected by the background. I put these on dark scrap clay to make them thicker and it shows through. They looked prettier before they were baked with the bright white of the translucent. Must use a light background or just use white clay instead of transparent (although in this case it was translucent in the scrap bits so that wasn't a choice)

I think I will use these as the centre of some felt flower brooches. I will post a picture when I have got round to it....

Wednesday, 17 March 2010

Glow in the Dark Rainbow Jellyroll cane

This is a neat cane which I learnt from one of Cindy Leitz's video newsletters  (I love Friday's the day they arrive!). There is a lot of excitement about this Friday's video as it is Faux Opals that look great!

I had to switch back to Fimo as I had Fimo Soft Glow in the Dark and Kato don't make one (might be worth an email suggesting that they do of course). I find the fimo so soft to work with now I don't really enjoy it.

I did for the first time ever put a cane in the freezer for 15 mins before slicing - worked a treat. The cane was nice and firm to work with after that - until it warmed up. Will have to try some of Cindy's cane slicing tips! I do need some help with slicing canes better so if anyone has some tips leave a comment or mail me! I shall make it a mission to experiment and perfect slicing canes.

Glow in the dark rainbow jelly roll cane!


So first things first I made the obligatory cane end tortoises (one from each end of the cane)


I gave these little guys glow in the dark eyes too ;)


I then made a couple of simple cane slice beads and a couple of lentil swirl beads, not sure I swirled them enough now - oh well next batch!

Well these beads have popped into my 'need holes' box as there was no way I was going to make a needle hole in fimo soft lentils - they'd be squished up (althought I suppose I could of employed the freezer again - must try that with some scrap ones). Once they emerge from the need holes box (waiting on my husband to either drill some holes or set me up to do it myself - he's the tools guy) they will make their way to my 'need sanding' box - one day they may emerge as some jewellery....

Tuesday, 16 March 2010

Playing with the extruder - square sticks

I have been playing a lot with  polymer clay recently, trying out new things.
I thought I would share some of them with you, here's the first...

Square sticks

I didn't quite take the right pictures so you will have to piece it together a bit yourself.

I put some sticks of polymer clay in the extruder barrel instead of the usual discs to see what would happen. As you can see I was just playing around and not taking my time to be neat. I would cut them into neater square cross section sticks of even size in future. On the right are 2 bits of the extrusion you get with a triangle pattern.

Here is a shot I took for my reference. I used square sticks in the barrel and the square extruder die and I got out the square diamond patterns. Here you can see what they looked like put together. There are 16 of the extrusions in that pattern piece. I put 4 together to make a larger square and reduce it, then cut and restacked into the slice shown.


I guess if you rotated the square extruder die in relation to the square sticks you would get a quarters pattern.

(just playing about with the e-pen I am trying out hence the sketch - I drew it on paper with the e-pen which also captures it as a jpeg)


You could of course just cut square or triangular  pieces of polymer clay and put them together to make this but it might just start you of on an experimentation with the extruder of your own.

Brand Comparison (sorry if you have seen this already)

For years I used Fimo polymer clay which is readily available here in the UK. Recently I found Cindy Leitz and having read a lot on her blog and seeing her beautiful colour mixing recipes I decided I ought to try Premo clay. There are some discussions about brands on Cindy's blog here. Being a fan of Donna Kato's work and having her excellent book I decided to try Kato polymer clay at the same time.

Here are some photos and notes about the different brands of polymer clay I tried;Kato, Premo, Fimo Soft and Fimo Classic.


First findings:
Kato - Very crumbly as it came out of the packet. Had to work it to warm it up before I was able to run it through the pasta machine. Firm, more difficult to shape. This polymer clay has quite a strong smell.

Premo - Very soft from the packet and was able to put it straight through the pasta machine. Soft to work with.

Fimo Soft (my normal brand) - Soft from the packet was able to put straight through the pasta machine. Very soft to work with.

Fimo Classic - I found this much the same as Fimo soft which surprised me. It wasn't quite as soft when first out of the packet but after being passed through the pasta machine a few times is was just as soft as the Fimo soft.

Flower Cane
First of all I made a Spliced Flower Cane in Blue, White and Green. I tried to keep the colours  the same as possible but didn't go to great extremes of colour mixing (I'm not that good at it - yet!)

 
Kato, Premo, Fimo soft and Fimo Classic (from left to right)
The top row was a slice cut with a tissue blade just after the cane was finished and the bottom row is the same brands cut after a rest (overnight).

I realised that my blade wasn't as sharp as it used to be but this didn't seem to matter for the firmer Kato clay. I am sure I can improve my cane slicing technique (and I have also since bought a new blade).

I can see very clearly that it pays to leave your clay to cool down before slicing what ever brand you use. I know many people recommend putting it in the fridge for a while - I must try that.

Wow the difference shocked me - the Kato one (made in exactly the same way) looks very different. I accept there may have been a slightly larger area of white in the middle but even so the definition that the cane retained is far superior.


A closer view of the Premo and the Kato flower cane slices

Geometric Cane
I realised that the spliced flower cane wasn't a completely 'repeatable' cane so decided to make a simple geometric cane to see how that turned out.

 
From left to right Kato, Premo, Fimo Soft and Fimo Classic
Again top row was cut straight away and the bottom row was cut the next day.

As I was making them I thought the fimo looked different but couldn't work out why - hmm I realise now I only did half the job. Not sure what happened to the next day kato sample but needless to say it looked much the same, insignificant deformation.

Although the difference wasn't as marked as the spliced flower cane - I still much prefer the results of the kato. I like the feel of the baked kato too.  The Kato white is more white and I think part of this is being firmer it stays cleaner.


 A close up of the Kato and Premo canes

Conclusions

As I was working the  spliced flower canes I thought I would prefer the Premo. I didn't like the work needed to condition the Kato clay and it was much firmer to work with even when thoroughly conditioned. The firmness is sometimes a disadvantage and sometimes an advantage. It was a disadvantage making the splice flower cane in the pinching the sides down. Also squashing the cane stacked quarters into a flat piece was quite physically demanding with the kato clay. At other times the firmness was an asset, cutting the bullseye canes into quarters was easier, less deformation. Things held their shape better and weren't floppy as they were with all the other brands at times. There was much less waste with the Kato et every stage. Even making skinner blends there was less waste from the Kato as it distorted less.

It is very much a personal preference and all sorts of things will effect your choice from where you live (temperature and also I gather some of the brands have slightly different formations in the states to UK), how you buy your clay (I have to buy Kato online can't get it in any local shops in the UK), the strength of your hands, what you like to make, how you work etc. Also if you don't want to mix colours the Kato range is rather limited.

However after I had seen the sliced and baked canes my mind was set - I'll give this Kato clay a go. I will probably invest in a little chopper to aid conditioning it isn't something I enjoy but I would say the results make that extra effort worthwhile. 

I am currently wriritng an article on conditioning Kato clay having tried out several different ways - coming soon.....

(when I first set up this blog I didn't understand how it worked and made this as a separate page. I have decided to post it here too in case people missed it on the other page - there are some comments on the separate page version which I can't or at least don't know how to copy over)

Photographing your work

I am not that happy with my current photographs but being on crutches at the moment I just can't fuss around setting up a photo session. I have a digital SLR but at the moment am using my Canon compact as I can carry it round in it's tiny pouch with a shoulder strap easily from clay space to comfy chair and laptop.

Once I am back on my feet I intend to set my self up to take some decent photographs and am looking at buying or more likely making some sort of mini studio -

 I have been reading up, thanks to some other bloggers.

There are some good links in this post http://polymer-clay-art.com/?p=224

Kate from Shibori Girl's blog has a tutorial for making your own light box here http://shiborigirl.blogspot.com/ . I think I might go down this route. I don't have any photographic lights but I do have a couple of very expensive full spectrum daylight bulbs which I was hoping would be bright enough - they give a good clean, natural looking light but I am not so sure they will be bright enough. Only one way to find out!

I'll update you on what I find to improve my photos. In the meantime I shall share one I am not happy with

Monday, 15 March 2010

Surf board spoon

It was my surf dude friend Al's birthday today. I decided (one of those lying in bed unable to sleep inspirations) to make him a surf board spoon. It turned out pretty well, my 5 year old son wants me to make him one now too. Here it is
I used a blue white and purple skinner blend stripe which I inlaid into the basic surf board shape which was made with translucent Kato polymer clay. I cover the spoon handle with white clay first as it showed too much without the covering. I also added a fin so there could be no doubt what it was. I hope it will be strong enough not to break too easily. It is made of Kato clay and was well blended in. I was sanding at night again and didn't see that spot I missed which is visable in the top photo. Must sand in daylight!

Roz Petalz Studio Giveaway

Roz Petal Studio is having a give away through facebook - Roz-Petalz-Studio facebook page

My favourite of her pieces is this one

I love black and red together and the addition of the green leaves adds another dimension. Cute little pendant.

Sunday, 14 March 2010

Keeping your hands soft - Gloves in a Bottle and glycerin


Whilst looking up ways to prevent the skin around my thumb from cracking painfully, which it has done every winter for the last couple of years, I came across Gloves in a Bottle.  I didn't think much of it at the time until I also came across it on a polymer clay related blog (can't find it again now of course) as something people used before working with polymer clay to protect their hands.

I found out that my local chemist stocked it so I went a got some to try. After one application my hands looked less dry and rough. I have now been using it a couple of times a day (they say to reapply every 4 hours) for the last month and have had no more cracked skin - hurrah!

If you have dry hands it might be worth trying too.

Another tip I have just picked up from Nena at  Katherine Art Jewellery is using glycerin in your sanding water to help keep you skin soft. I have a whole heap of sanding to do (I am thinking of getting a rock tumbler) so I am going to try this out. I'll report back of course.

Saturday, 13 March 2010

Pasta Machine Thickness Chips

For ages I have mainly used the largest and the smallest settings on the pasta machine (I have an Imperia one with 6 settings). I can't see much difference between the first 3 settings. I decided to spend 5 minutes making some reference chips from some scrap.

Pasta Machine Thickness Chips

There really isn't much difference between the first 2 settings, hardly worth having. So now I can check and see what the settings correspond to. Not sure how much I will use it but I am glad I now know not to bother with setting 2 at all.

Thursday, 11 March 2010

The tutorial is here!

The Surfing Cat Graduated Pointy Stripe Extruder Technique - Polymer Clay Tutorial

Kato Colour Chips

Now I have decided on a brand to use, Kato Clay I have started working my way through some of the exercises in Maggie Maggio and Lindly Haunani's book- Polymer Clay Color Inspirations . I am no colour expert having had no formal art training, I did a science degree and worked in scientific research for a while before retraining to teach in Primary Schools (4 to 11 year olds ). I do know the basics of colour mixing but I struggle a little with the polymer clay colours as I haven't mixed them much in the past and also I struggle combining colours in projects.

My kind neighbour took the kids out for a couple of hours and my lovely husband went to do the food shopping so I settled down (with my leg up) to make some colour chips. The recipes in the book aren't ideal for kato as they suggest using 2 different yellows and 2 different blues. These colours are available in Premo and Fimo but there is only 1 blue and 1 yellow for Kato. I played about with the quantities a bit to make some different colours.

I enjoyed fiddling around making new colours and I can see these chips will be useful in future as I can pick up the colours I want to use and then check the back for the recipe to mix.

 Tasting tiles or colour chips in Kato Polymer Clay. Blob on top is colour mixed 1:1 with white and there is a pie chart recipe on the back.

I spent the night dreaming of colours which was a new experience for me and I can't wait to try and mix some more.