Showing posts with label polymer clay. Show all posts

Thursday, 2 June 2011

Baking experiments part 2 - with videos!

So in part 1 I discovered that for optimum strength you should turn your oven off at the end of the baking cycle and leave your polymer clay pieces to cool down slowly in the cooling oven. This was just an initial test to see if the set up was going to work before I made lots of samples with more complicated curing, and something I had always been curious about. I was happy that the test worked and set about making more samples (got a blister from the extruder - am thinking it might be time to look at those walnut hollow ones....).

For these tests I chose to cool all my samples at room temperature, although I knew they would be stronger if I let them cool slowly. It was easier to control the curing, meaning I didn't have to reheat the oven for each curing and also the testing would be quicker if the specimens weren't as strong There will be a third round of tests where I search for the real optimum curing based on what I have learnt so far. As before samples are all made from very well conditioned scrap Kato polymer clay. They are extruded cylinders and are approximately 10 cm long and 6mm in diameter. You may note, looking at the results below, that I only repeated each test twice this time. I made three samples each time but as the results were reasonably close and there were a lot to test I decided that two was enough! I haven't got round to polishing the samples yet, to see how shine is affected by cure time/temp - that's a job for another day!

Cure time tests
I  tried curing samples for different amounts of time. The temperature for all the samples was 150°C and they were removed from the oven at the end of their cure time to cool at room temperature. The samples cured for 40 min had some longitudinal cracks on them when they were removed from the oven, however there was no sign of the cracks when they had cooled.

Cure time results
10 min -breaking point weight -  501g, 481g
20 min - 2035g*, 1986g*
40 min - 1900g*, 1935g*
*weight of water when specimen bent out of jig.

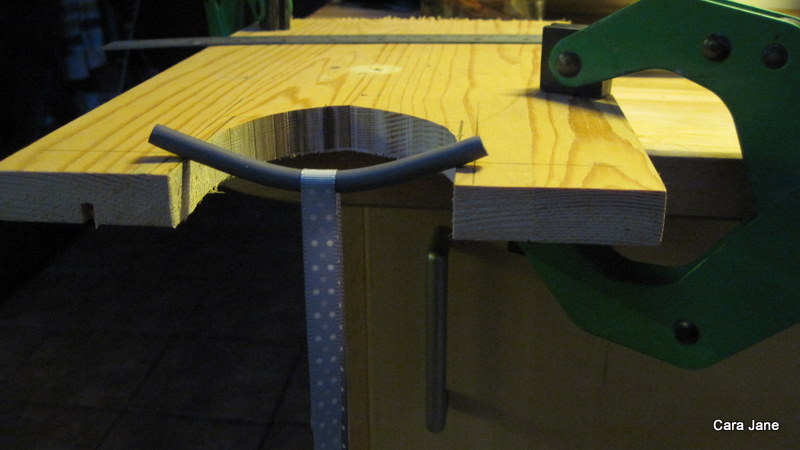
The weights given for the 20 and 40 min cure samples are not particularly relevant as these samples didn't break, they curved so much they slipped through the test rig. You can see this happening and the test set up in the video below.

Video showing the test set up and how the strong samples bent and slipped out of test jig.

Just managed to photograph this specimen as it started slipping through - see how bent it is!

Having looked at the samples I conclude that for 6mm thick pieces 20 minutes curing is sufficient for  strength and perhaps 40 min is too much due to the presence of the cracks on the warm sample, although this wasn't proved to make them weaker.

Oven temperature tests
All samples had 10 min in the oven at a set temperature that was verified with an oven thermometer, they were then removed and cooled at room temperature.


Oven temp results
140°C (~280F)- breaking point weight -440g, 380g
150°C (~300F) - breaking point weight -501g, 481g
160°C (~320F)- breaking point weight -1076g, 900g
170°C (~338F)- breaking point weight -1567g, 1498g

As you can see that change from 150°C to 160°C and again to 170°C makes a significant increase in strength!

Here's a video of a 140°C sample so you can see how little it flexed before breaking, compared to the 150°C for 20 min sample  in the video above.

Video showing a test where the 140°C for 10 min cure specimen breaks without much bend


In a recent post on the Kato facebook page (31st March if you want to look back and find it, can't find a way to make a direct link to that post) Tony Aquino,  the technical director at Van Aken, who manufacture Kato polyclay, discussed curing temperatures (great timing thank you Tony!). He said that higher temperature of curing would mean stronger clay, my tests show this too.

Conclusion of my experiments so far

Increasing the cure temperature increased the strength of the sample significantly but the samples still all broke. Increasing the cure time meant that the samples were much stronger and held about  2kg, or 2 litres of water before they bent so much they slipped through the test jig.  That may be to do with the increased time allowing the temperature in centre of the specimen to reach the correct temperature or some other factor, I'm not sure.

 I would like to do some more tests looking at cure time against thickness of specimen so that I would know the ideal time for all thickness of clay. Next time I am bored I guess!

I will cure my next specimens at 160oC (320F) for 20 min, and leave them to cool in the oven as it cools down. This would seem to be the best way to cure 6mm thick Kato Polyclay  for optimum strength. I will test this and let you know the results.

This blog will soon be finding a new home, I do hope you'll move with me - I'll keep you posted

Have fun with your polymer clay
Cara

Thursday, 26 May 2011

Special pen

It's my husband Richy's 40th birthday today. Hopefully he is having fun at work while I bake his cake and prepare a special meal for dinner!

He got lots of presents from me and the children but here's one I wanted to share with you.

 Rhodium plated pen with polymer clay decoration
The pen looking all fancy in it's presentation box

You may remember I made a pen for my mum recently, from a fairly average pen kit and I was really chuffed at how great it looked compared to covering a biro. Well this was a fancy pen kit, rhodium plated no less. It cost more than I would normally dream of spending on a pen but it was for my wonderful husbands 40th birthday. It looks great it has a real air of quality about it and the parts went together much more easily! I particularly like that the barrel is in one part so only 1 part to cover and there's no band in the middle so you could shape the barrel if you wanted (although straight is easy!). With the 2 barrel pens if you don't get the thickness just right it can look a bit odd. I ordered a few more of the cheaper pen kits when I ordered this but I think I shall spend a little more and get a better quality kit to work with in future, they do plain chrome ones the same as this which are much more reasonably priced.

Right back to my baking.....

Monday, 23 May 2011

Beaux Bangles with Carol Blackburn

I was lucky enough to attend a workshop with the lovely Carol Blackburn yesterday. The workshop was organised by Clectic Events (Rebecca Thickbroom) so I knew it would be well organised, and indeed it was! It was great to spend time with so many lovely people. To catch up with some people I now consider old friends and to meet some new friends too! And even better I get to see a lot of them again this Sunday at the London Polymer Clay Group Meeting .

I haven't got long to write this post as I am preparing for my husbands 40th birthday on Thursday (i.e. making all the stuff I meant to make for him weeks ago but...) so I shall show you what I made (quickly snapped photos too - sorry).

I made 2 bangles in the workshop, although I had to finish bits of both of them at home today.

The first bangle I made I used Fimo, as the workshop was being sponsored by them and we had been given some blocks. I used to work with Fimo soft until they reformulated it and it became too soft for my liking, then I swapped to Kato and have never looked back. I have sanded it  but it doesn't feel as nice as the Kato and I found it too sticky and squishy when I was working with it. It does smell better though! I really like one part of the bangle - this bit here

it's a neat looking pattern and I like the spread of colours. And I really don't like this bit

it looks kind of smeared and messy and the colours don't work. The structure of it is good and sturdy and I like the technique Carol showed us.


The stripy one  is a lot more chunky than the first one and has a core of sculpey ultralight (thanks Toni for providing it!) so it isn't much heavier. It was the first time I have worked with sculpey ultra light, and possibly the last, it's like marshmallow! The rest of the bangle is made with Kato clay. It needed more sanding at the middle stage really but I rushed it as I wanted to get it covered in the class so the outer profile is a little lumpy and bumpy and not the best shape. It's quite a striking piece of jewellery though and you don't see the lumps and bumps.

I've done some more baking experiments (which I will report when I have a moment) so I hope with my new knowledge from Carol's workshop and my experiments I can make strong skinny bangles too. Can't wait to try out some more big bangles but it will have to wait, birthdays and then school holidays - hmm perhaps my children would like to make some too! My 6 year old son loves to make jewellery for his girlfriends, will have to find a child size bangle form!

The Ripple Effect is another Carol Blackburn/Celctic Events workshop happening in London on the 21st August. I can't make that one unfortunately but I've seen the sample pieces and they look great!

Sunday, 15 May 2011

Baking experiments part 1

In order to find out how best to make strong bracelets I have a series of experiments planned. The first thing I wanted to find out was if polymer clay is stronger if it's quenched, that is plunged into ice cold water straight from the oven. I've heard people say this makes it stronger, polish better and it will keep transparents more transparent. Well I'm using grey coloured scrap Kato clay so can't comment on the transparency but my findings were that it doesn't make clay stronger or polish better.

I wanted to know how strong polymer clay was when it was being bent so my clever engineer husband set up a test for me. I used to do similar work with composite materials for a living as a research materials scientist but I had big expensive machines and gauges to record what was happening (I've got a photo somewhere I will try and dig it out). My husband has also done similar work (we met at work) but is better at finding alternative ways to do things than I am, he's a real problem solver!


Here is one of my extruded rod samples, of extremely well conditioned Kato scrap clay. They are 10cm long and about 6mm in diameter. I chose to extrude them so I could be sure they were as similar as possible.


The sample is 'bridged'  over a gap. A loop of ribbon is passed over it and attached to an empty milk carton. Water is poured into the carton until the samples breaks and then we weighed how much water the sample had 'held'. My husband tried to poor the water into the bottle at a steady rate, he isn't holding the bottle just has his hand under it to catch it when the sample breaks so the water doesn't spill. We weighed the water in the bottle at the point that each sample broke.

One of the test pieces not long before it broke! As you can see it has bent quite a bit.

All the test pieces were baked at 150°C (verified with oven thermometer) for 10 min. At this point
three samples were taken out of the oven and left on the side to cool, I am calling these samples 'room temperature'. Three were plunged into ice water, I am calling these samples 'quenched' and three were left to cool in the oven which was turned off  and cooling down slowing, these are called 'slow cool' samples.

The results
'Quenched' samples breaking point weight - 485g, 673g, 772g
'Room temperature' breaking point weight -501g, 481g, 759g
'Slow cool' samples breaking point weight- 1069g, 1274g, 1522g

As you can see although there is a fair bit of variation in the results without a doubt the 'slow cool' samples were significantly stronger in flexure (being bent). Watching the test they obviously bent a lot more than the other 2 types of samples before snapping. I'll try and video one of the next ones so you can see a test in action.

I then polished one part of each type of sample using my micromesh  cloths and counting the strokes, doing the same for each. The verdict on that is that there is no discernible difference in shine between them.

This test was with Kato clay, I am curious if it's true for other polymer clays but being as I don't use other brands I probably won't take the time to find out I'm afraid.

I am going to do two more tests one to see how the baking temperature effects the strength in flexure (bending) and shine and one to see how the baking time effects the strength in flexure and shine. I am pretty sure that the longer baking time will make them more shiny when polished as that is one of the reasons I currently bake for longer, it will be interesting to find out in a more controlled way though.

The results may be a while coming so in the meantime I would advise that if you want your clay strong, leave  it to cool down in the oven after turning it off when you have finished baking!

Friday, 26 November 2010

Gingerbread men

My friend Moe has been making some super cute Hawaiian gingerbread men and hula girls - like this...
I got inspired and made some more traditional gingerbread men Christmas earrings.

Friday, 26 February 2010

Busy polymer clay day for all the family

We have been busy playing with polymer clay for a lot of this afternoon (me with my bad foot up on a chair and lots of pain killers). Here are some things we made

James made an X wing (from star wars)


Daisy made a spoon, I gave her the bits she is too young(not quite 4) to be making roses on her own, yet....


I made my first kalidescope cane which was originally going to cover a
base to hold some pens for gifts but I had the wrong type and they melted in the oven so I changed to making  teaspoons and used a few slices of the cane to made a bead just because and off course the cane end tortoises I now always make. See polymer passions blog  for details of how to make them.  


Here is one of the 'filament wound' spoons I made as a gift for some people I used to work with 'filament winding' . It is a composite materials manufacturing technique where you wind carbon fibre around a steel madrel to make a carbon fibre tube. This is made from fine extruded black polymer clay (fimo in this case) wrapped round a teaspoon handle that had been coated in a layer of black fimo. I think this effect would be good using some colours so I will try it out another day.
I also  made a rather large bangle! I bought the tutorial from Tonjas Treasures but hadn't printed it out so tried it from memory having read it once. Being on crutches I formed it round a glass on the table which was to hand as I can't just rumage around like I would normally. I don't have any texture plates so must get round to making some to do this next time.


Thursday, 25 February 2010

Some more things I made in the past

Black, white and red heart. I made this with some cane ends and I love it. It just sits in a box of baked fimo bits. I ought to find something better to do with it!
Made May 2008


Heart shaped keyring. Made May 2008


A panda I made for a friend. Made March 2008

Things I have made in the past

Peppa Pig cake topper made for my daughter's 2nd birthday cake. Made March 2008

Earrings made from beads made from a slice of cane for my niece.Made March 2008
Spoons made from an extruded rainbow 'string' for my children. They use them everyday and I keep thinking I should make my own special spoon! Made August 2008

Posted by Picasa

Monday, 22 February 2010

Bee brooch

I made this brooch as a birthday present for my Mother-in-law. Feb 2010