
Wednesday, 3 March 2010
Playing with clay
I have been busy playing with clay all day. I have almost finished a paisley cane, not sure how I am going to reduce it yet. I look forward to sharing it with you in the morning - too tired now!
Great links from Doreen
Doreen said...
I have tried all the clays. I like Kato the best! Here are a few resources for color mixing. I've posted on my blog about some of the tools I use
http://www.shadesofclay.com/more/Images/Colour%20Mixing%20Chart.jpg
http://polymerclay.craftgossip.com/kato-recipes
http://www.shadesofclay.com/more/Color%20Recipes.htm
http://doreenwilley.blogspot.com/2009/05/kato-polyclay-color-mixing-guide.html (expensive, but really handy)
http://doreenwilley.blogspot.com/2009/02/more-about-color-mixing-and-matching.html (I love this!)
Hope this helps :)
I am writing this whilst sat on a bag of crumbly Kato to try and warm it up to make it less crumbly ;) The 3 in 1 color tool Doreen mentions in the last post is available from amazon.com but not the UK amazon - so typical!
Backyard Beads Giveaway
As always I start my day with a little hop around the internet polymer clay world to see what interesting inspiration and tips I can find. Today I happened across some more wonderful blogs (I wonder if there is anyone who has seen every single polymer clay artists blog?)
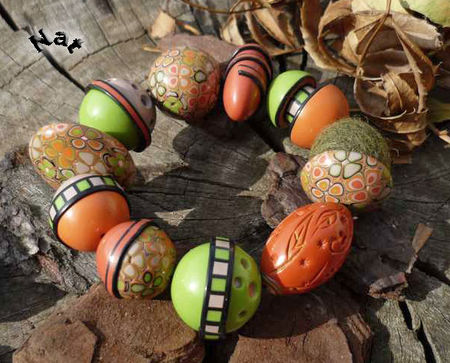
I came across a post on Backyard Beads announcing the opening of Doreen's Backyard Beads ETSY store. I love these Wild Things beads and am sure she will do well with her store - go check it out! If you look on her blog you will see she is doing has a giveaway, the prize being these beads pictured. Congratulations on opening your store and I look forward to seeing more of your beads.

I came across a post on Backyard Beads announcing the opening of Doreen's Backyard Beads ETSY store. I love these Wild Things beads and am sure she will do well with her store - go check it out! If you look on her blog you will see she is doing has a giveaway, the prize being these beads pictured. Congratulations on opening your store and I look forward to seeing more of your beads.

Doreens Wild Things Beads you could win in her blog giveaway
(I also noticed that Doreen seems to be very good at finding giveaways from other people looking at her blog so I shall keep an eye on it so I don't miss out on entering other giveaways. Thanks Doreen)
Tuesday, 2 March 2010
My work from Polymer Clay Color Inspirations by Lindly Haunani and Maggie Maggio.
Package Colour Testing
Made some with Premo then decided I was going to use Kato as my main clay so made some of those too. It was interesting to see how the colours changed when they were mixed with white and also how the baked colours compared. Useful knowledge so worth doing.
Value Sorting
I found this hard, to see the value of the colours. Then inspiration struck and I used my digital camera in black and white mode as my eye. Now I have got used to the idea I can see the value better myself without digital aids ;) Perhaps that turquiose is between the lighter and mid grey. I am not quite sure how to use value but I hope to work that out one day.


Seeing value through the camera
Tasting Tiles

Premo tasting tiles in green, they have the little pie chart recipe on the back.
Found it hard to tell the yellows apart when baked so wrote on them to remind me.
I made some of these in Premo and now have to make some in Kato - post to follow soon.
Storing Fimo
I emailed STAEDTLER who manufactuer Fimo about storing it. Here is their response
So now you know ;)Please store unpacked material wrapped in aluminium foil, in tins or plastic bags (PE / PP). Please avoid unhardened FIMO coming into contact with polystyrene (PS), PVC or Styrofoam, since the surface may undergo a chemical change - as described in your mail.

Monday, 1 March 2010
Thank you Zuleykha
Thank you to Zuleykha for featuring my flower cane on her blog but I couldn't have done it without your tutorial!

In case anyone wanted to know I used Premo Turquoise for the cane and the darker colour is the same turquoise mixed with a little black (perhaps I am not so bad with colours after all ;)


My first curling petal cane
I still think your curling petal cane is better.

One of Zuleykha's curling petal canes
Tutorials from Parole de pate
Having been off my feet recovering from surgery for quite some time last year and now again I have probably had more hours than most people to trawl round the internet. There is an amazing amount of information and inspiration for polymer clay artists out there. I am sure you all have your favourite blogs and sources of information (feel free to post a link in the comments to any of your favourites as I may have missed some).
I wanted to share a few blogs that aren't in English with you as it took me a while to come across them and then I was put off initally by the language problem - my French is rather rusty and not that technical anyway. Then I discovered Google Translate! To start with I loaded the web link into the google translate page everytime but then I found the translate button. If you scroll down to the bottom of this linked page you can find a button you can drag to your tool bar for your language. I now have the English one on mine and if I find a site that is in a different language I press the button and it translates it (often rather ammusingly but you can get the gist - cane is translated as duck in French by google )
So check out the French blog http://paroledepate.canalblog.com/ It is described as a 'living newspaper' of all things polymer clay. There are plenty of tutorials on this site, from artists around the globe.
In the Canes tutos archieve there are 7 pages, yes 7 pages!, of different tutorials of all sorts of canes.Polymer clay addict heaven!
They have even kindly translated some into English and these can be found on the translation__traduction page
 The first tutorial on that page is from Nathalie is to make these beautiful extruder flowers as seen in some of these beads above. I have very briefly tried this with a few bits of scrap clay but without the Core Adapter as I don't have one, I replaced it with a disc with 7 holes in as shown by Galina in her Russian Blog (again that google translate came in handy!) Here is my first attempt.

Cindy Leitz has a video which shows this technique as part of her members video library - Extruder flowers video information
I wanted to share a few blogs that aren't in English with you as it took me a while to come across them and then I was put off initally by the language problem - my French is rather rusty and not that technical anyway. Then I discovered Google Translate! To start with I loaded the web link into the google translate page everytime but then I found the translate button. If you scroll down to the bottom of this linked page you can find a button you can drag to your tool bar for your language. I now have the English one on mine and if I find a site that is in a different language I press the button and it translates it (often rather ammusingly but you can get the gist - cane is translated as duck in French by google )
So check out the French blog http://paroledepate.canalblog.com/ It is described as a 'living newspaper' of all things polymer clay. There are plenty of tutorials on this site, from artists around the globe.
In the Canes tutos archieve there are 7 pages, yes 7 pages!, of different tutorials of all sorts of canes.Polymer clay addict heaven!
They have even kindly translated some into English and these can be found on the translation__traduction page

Need a bit more contrast next time but they were the colours I had out at the time
Cindy Leitz has a video which shows this technique as part of her members video library - Extruder flowers video information
Subscribe to:
Posts (Atom)


